At Cloud Sultans, our mission is to help small and large businesses to better collaborate and achieve high productivity with their teams by maximizing the power of Google Workspace (formerly GSuite). Part of this goal revolves around effective communication and maintaining a manageable, efficient inbox.
As we navigate through the digital age, an overflowing email inbox has become a common challenge for many. The constant barrage of messages, from critical business communications to informative newsletters, often leads to a cluttered and overwhelming inbox.
But fear not, this article will walk you through a step-by-step approach to systematically organize your Gmail inbox, ultimately aiming for the much-coveted “Inbox Zero”. We will teach you how to leverage the power of Gmail so you can regain control and bring organization to the chaos.
—->>>> Cloudsultans.com we love helping our clients and guide them to success. That’s one of the reason, we ask you please to share this post in social media to your network. 🙂
1. Establish Your Email Categories
Before diving into the mechanics of organizing your inbox, it’s essential to comprehend the type and purpose of the emails you receive. More often than not, they can be placed into one of three categories:
-Follow up
-Awaiting response
–To read
By segregating your emails into these categories, you are laying a solid foundation for an organized inbox. The idea is to create a manageable system where you can promptly deal with all incoming emails, never missing a follow-up, and being able to track all your responses efficiently.
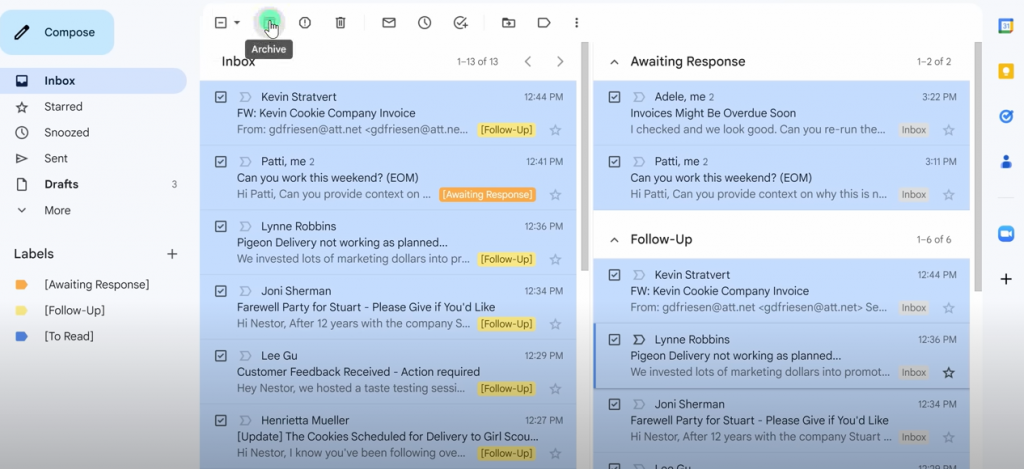
2. Create Purposeful Labels and Colorize Them

Having defined your email categories, the next step is to create corresponding labels in Gmail. Labels act like personalized folders where you can group related emails. Create labels named ‘Follow up’, ‘Awaiting response’, and ‘To read’.
A clever trick is to include brackets in your label names, ensuring that Gmail always displays them at the top of your labels list, irrespective of alphabetical order. Next is to add a splash of color to your organization. Gmail allows you to colorize your labels, adding an extra layer of visual differentiation. You might opt for;
- An eye-catching orange for ‘Awaiting response’
- A Sunny yellow for ‘Follow up’,
- A calming light blue for ‘To read’.
This color-coding makes it a breeze to identify your email categories at a glance, enhancing your overall productivity.
3. Harness the Power of Multiple Inboxes
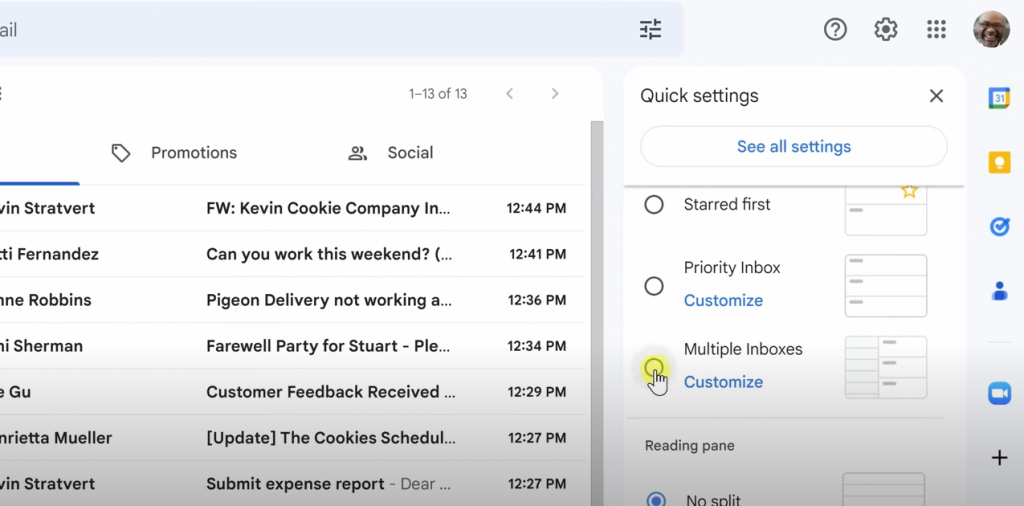
One of Gmail‘s hidden gems is the ‘Multiple Inboxes’ feature. This tool allows you to split your traditional single-stream Gmail inbox into separate sections, each dedicated to a specific label. This visual division of your inbox brings a sense of order and structure, making email management a less daunting task.
You can access this feature in the settings section and enable ‘Multiple Inboxes’. When customizing your inboxes, use the exact label names you created earlier. For instance, for the ‘Awaiting response’ section, use ‘label:[Awaiting response]’. By doing this, you’re effectively delegating a distinct space for each of your email categories.
4. Tactically Organize Emails into Relevant Sections

With your color-coded labels and multiple inboxes ready, the real action begins. It’s time to start sifting through your emails and moving them to their appropriate sections. While this process may appear overwhelming, remember, each email you process is one less in your cluttered inbox.
Evaluate each email’s nature and move it to the corresponding category:
- ‘Follow up’ for emails requiring your action
- ‘Awaiting response’ for those where you’re waiting for others to act,
- ‘To read’ for emails not demanding immediate attention but need to be read at some point.
This sorting process fosters a conscious interaction with your inbox, enabling efficient task management.
5. Embark on the Journey to Inbox Zero
Having neatly organized your emails into distinct sections, your next objective is to reach “Inbox Zero”. This concept doesn’t imply having no emails; rather, it refers to having no emails left unprocessed in your main inbox. With a clean inbox, you can focus on emails that genuinely require your attention, be it following up on a task or responding to an important email. After processing each email, remember to remove the respective label. This way, only pending tasks remain in your multiple inboxes, preventing clutter from piling up.
6. Leverage Additional Gmail Features for an Organized Inbox
Remember, an organized inbox is an ongoing process, not a one-time event. As your email volume grows, Gmail offers additional features to ensure your inbox remains manageable. The star icon helps prioritize emails within a section, while the dedicated view allows for a more focused reading of multiple emails in a specific category.
In the digital era where emails form a substantial part of our communication, having a well-organized inbox is no longer a luxury, but a necessity. Achieving “Inbox Zero” may initially seem like a distant dream, but with the right strategy and consistent approach, it is very much within your reach. The key is not just to organize, but to create an efficient system that works for you. By implementing these tips, you can transform your Gmail inbox from a source of stress to a powerful tool for productivity.
Any questions, comments, or reactions about our article, we’re happy to hear that in the comment section below. We always love diving into healthy discussions.
If you also feel that you haven’t been using Google Workspace at its best, reach us at (Cloud Sultans : contact@cloudsultans.com). We offer free consultation or system audit to find you the best possible solution.