The Google Docs’ new eSignature feature, enables users to collect electronic signatures directly within Google Workspace. It guides users on setting up signature fields, sending documents for signing, and ensuring document security through an auto-generated PDF and audit trail.
The tool is ideal for single documents, with fields for names, initials, and dates, all centrally stored in Google Drive for easy access. While there’s no automation for bulk signature requests, the article highlights third-party options for high-volume needs. Additionally, it explains when to use eSignatures for external parties versus the internal “Document Approvals” feature.
At Cloud Sultans, our mission is to help small and large businesses better collaborate and achieve high productivity with their teams by maximizing the power of Google Workspace (formerly GSuite).
✍️ Introducing eSignatures in Google Docs: A Streamlined Approach
Google Docs has launched a new eSignature feature, making collecting digital signatures within documents easier. Before, users often had to use external tools or scan ink signatures, which interrupted workflows and added extra steps. Now, you can keep everything within Google Drive, simplifying tasks and maintaining document security. This is an excellent solution for professionals needing a quick and reliable signature collection.
🛠️ Availability and Setup Requirements for eSignature Functionality
To get started, your IT administrator must assign the correct license type mentioned below to your account and verify that the eSignature feature is enabled in the Google Admin Console. This feature is usually active by default unless manually turned off. Users can confirm they have access by opening a Google Doc and checking the “Insert” menu for the “Signature Field” option.
This eSignature feature is a premium tool and as per the official Google Support article, it is supported by Google Workspace Education Plus, Business Standard, Business Plus, Enterprise Starter, Enterprise Standard, Enterprise Plus, Enterprise Essentials, and Enterprise Essentials Plus. Following are the step-by-step instructions on how to enable the eSignature feature from the Admin Console.
1. In your Google Admin console (admin.google.com), go to Apps > Google Workspace > Drive and docs and then navigate and select the section named “eSignatures”
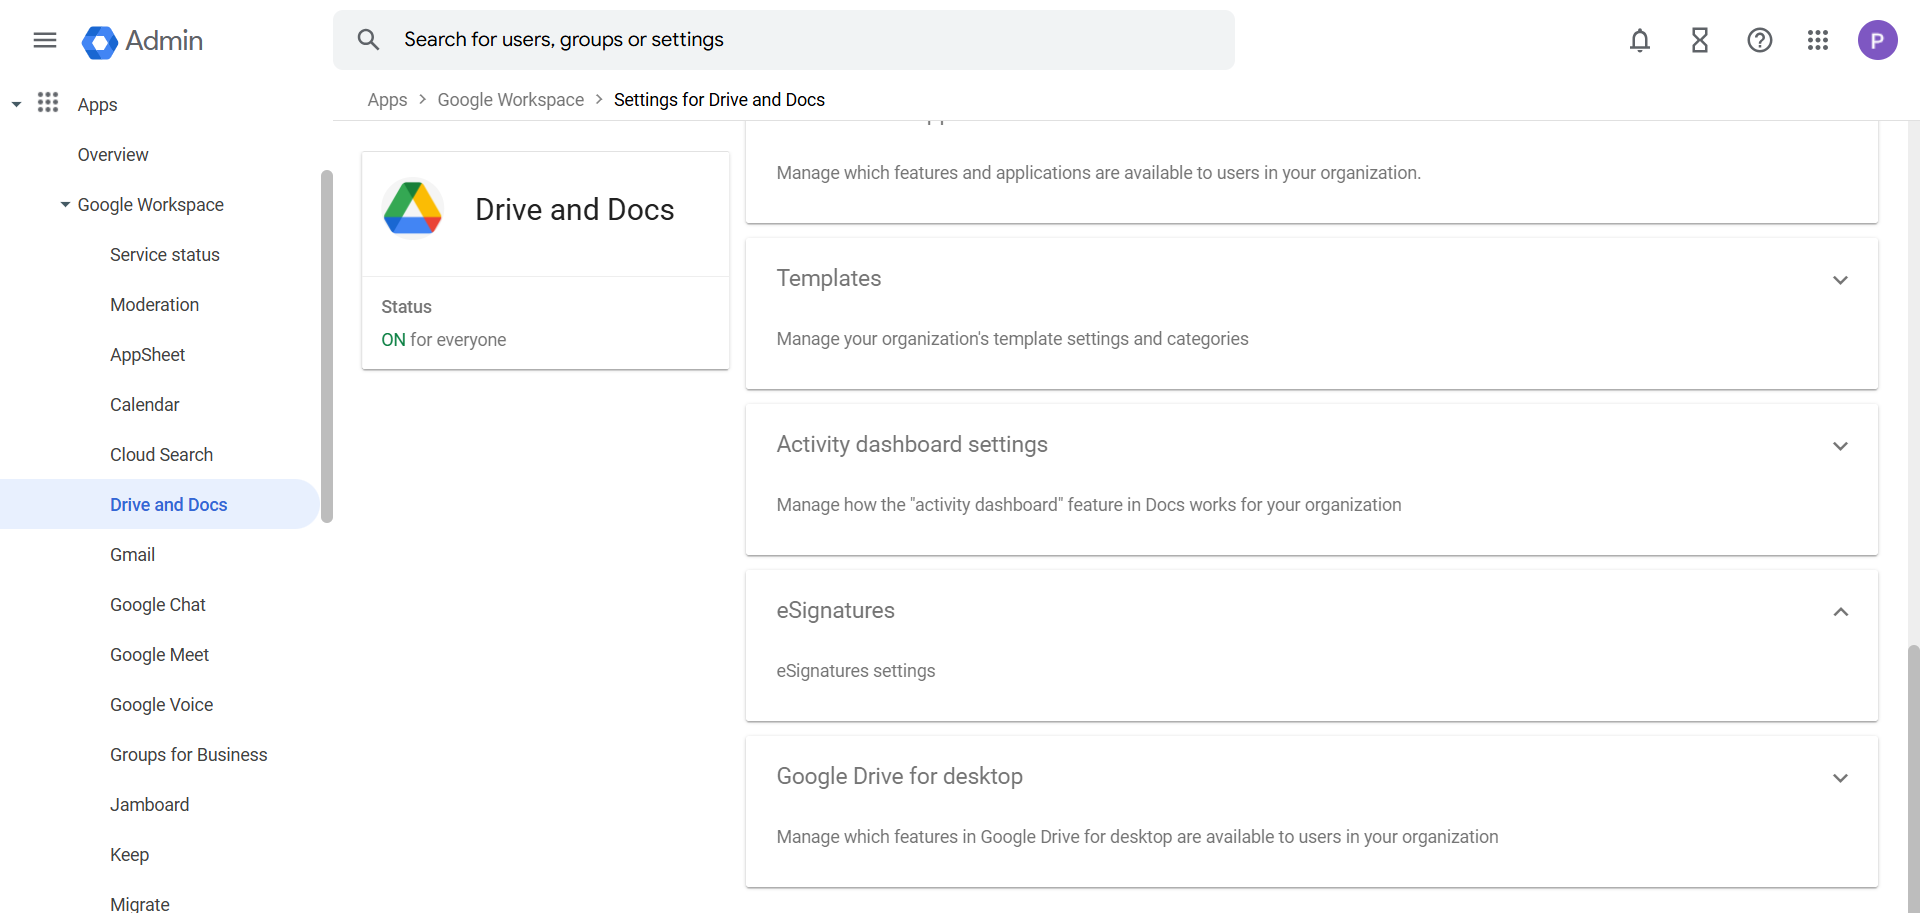
2. Then you should see the option named “Allow users in your organization to request eSignatures on files”. Now you need to select the desired audience from the left-hand side which could be an OU or a Group and enable the eSignatures for that audience.
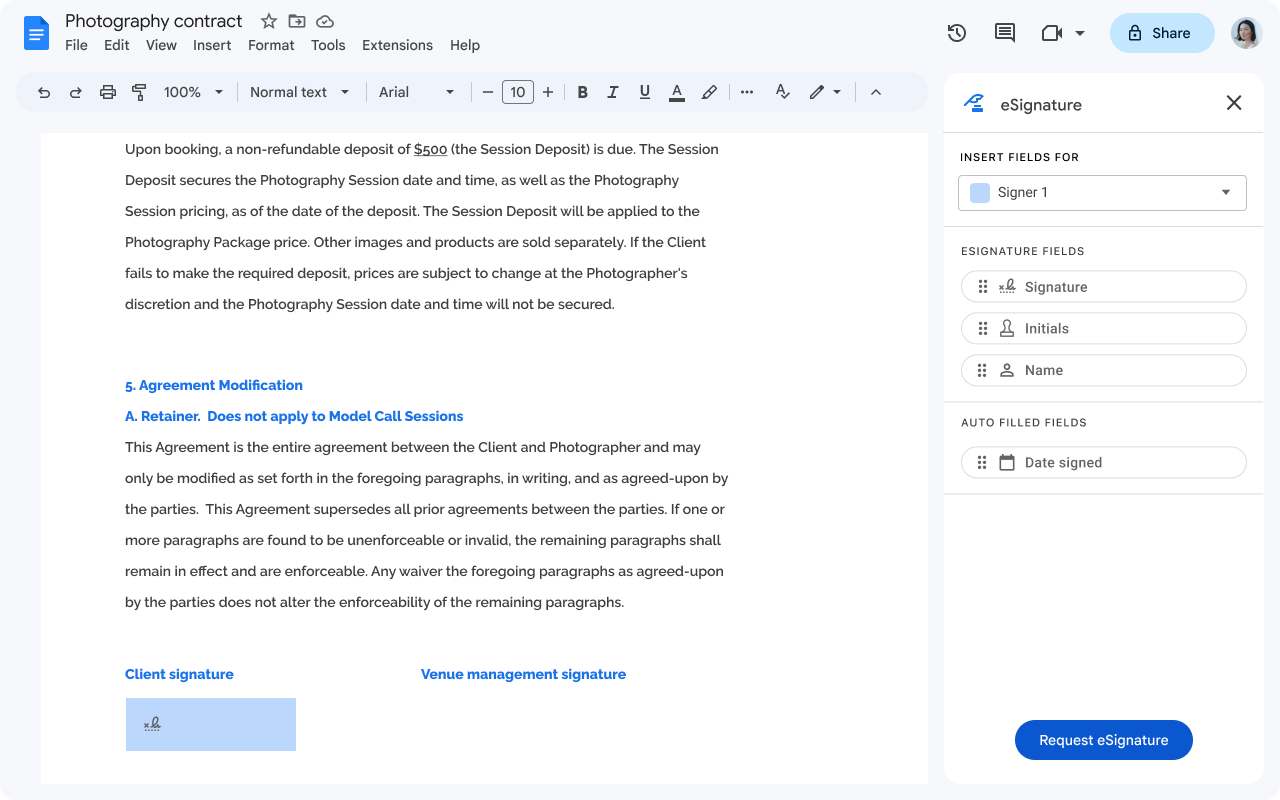
📝 Adding Signature Fields to Your Document
You can insert fields for signatures, initials, names, and dates, all within the document. To assign signers, you’ll specify name(up to 10 signers can be added per document). This flexible setup allows for multiple fields on a single page, covering different signatories if needed. By adding each required field, the document becomes ready for a streamlined eSignature collection.
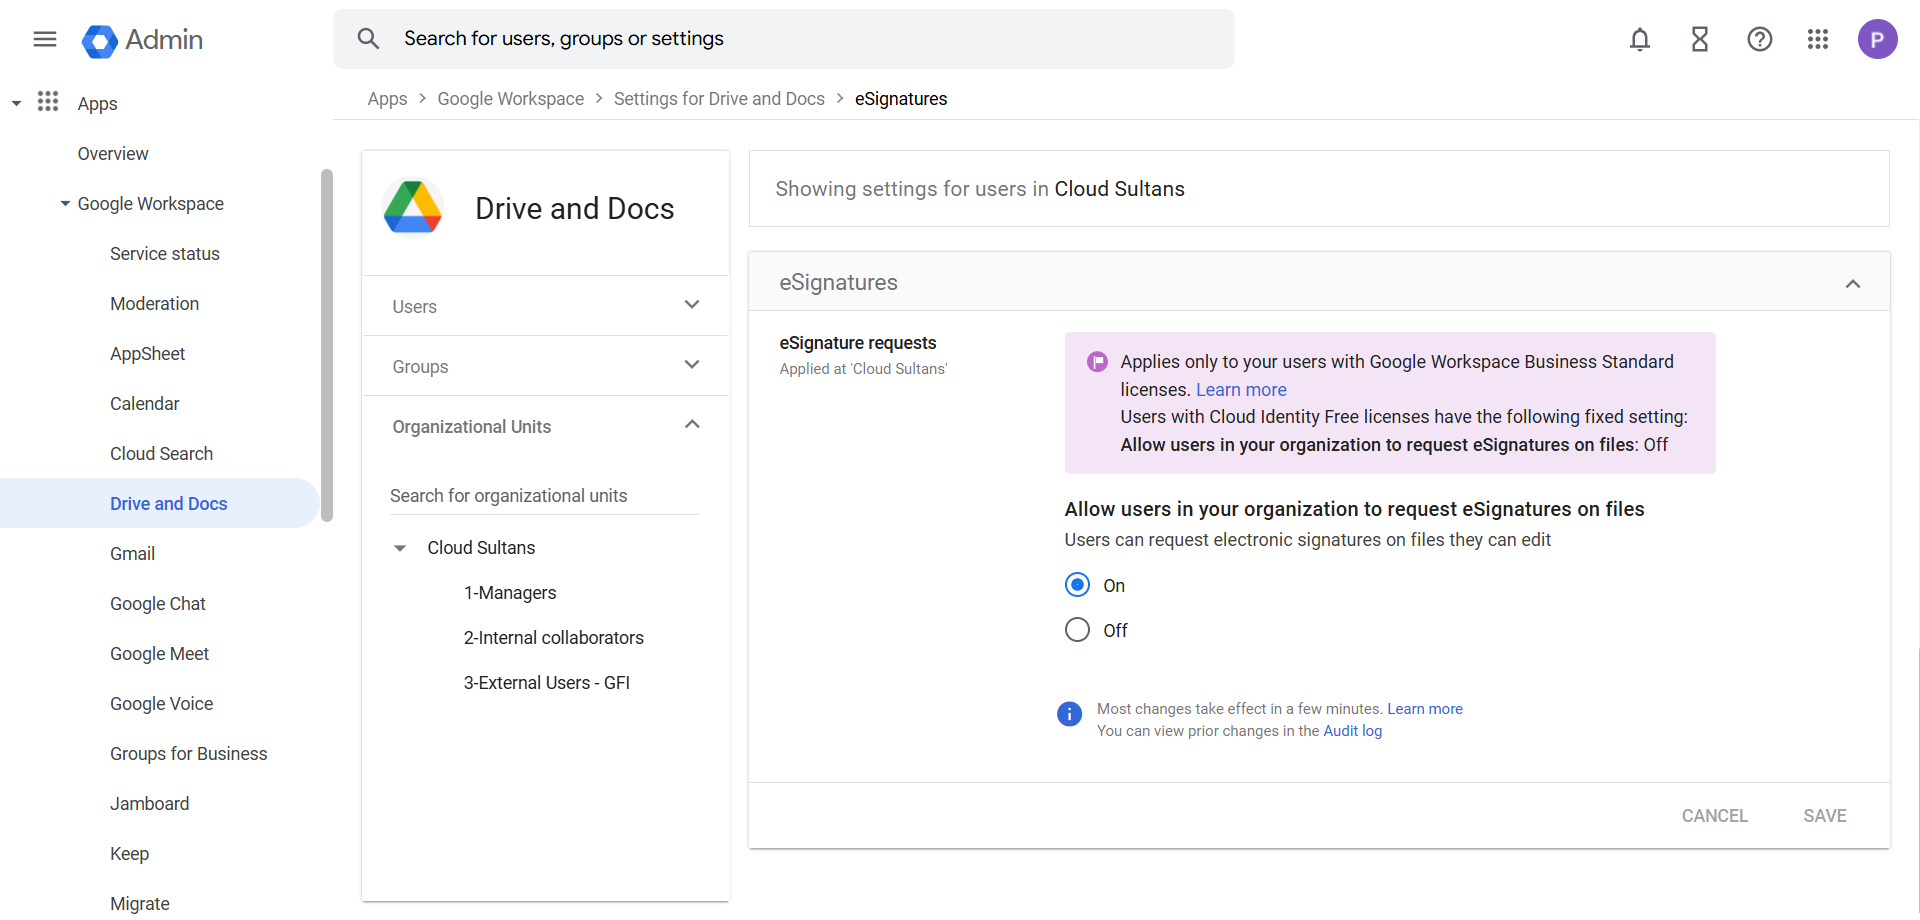
1. Adding signature fields in Google Docs or a PDF is straightforward. Open the Google Doc that you wanted to insert the signature fields.
2. Now select the “Insert” option from the menu and click on the option named “eSignature fields”.
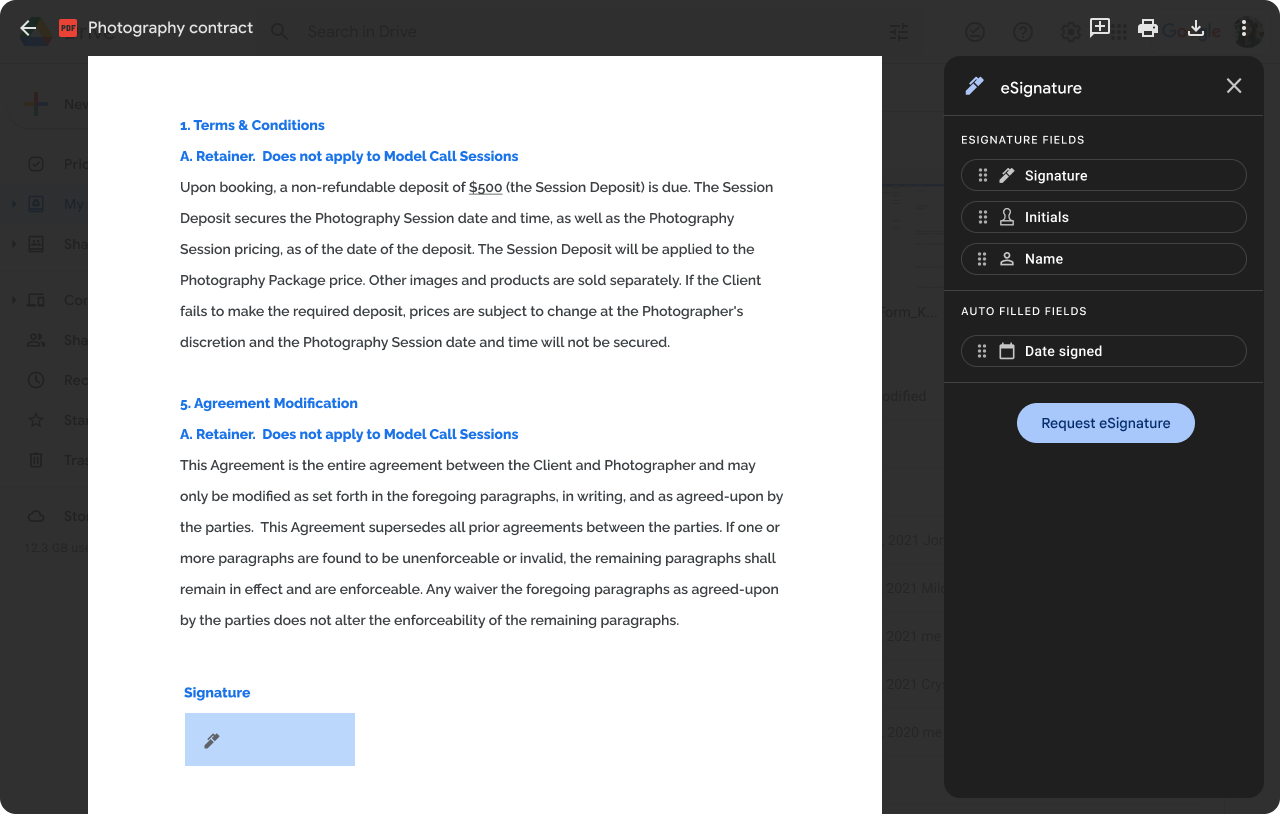
3. Now you should see the signature fields on the right-hand side. You can insert signatures, initials, names, and dates.
4. If you want to use PDF files for eSign, then go to drive.google.com > Upload a new PDF file or find an existing one > Open the PDF file in viewing mode > at the top right, click Menu > eSignature.
📧 Sending Your Document for eSignature Collection
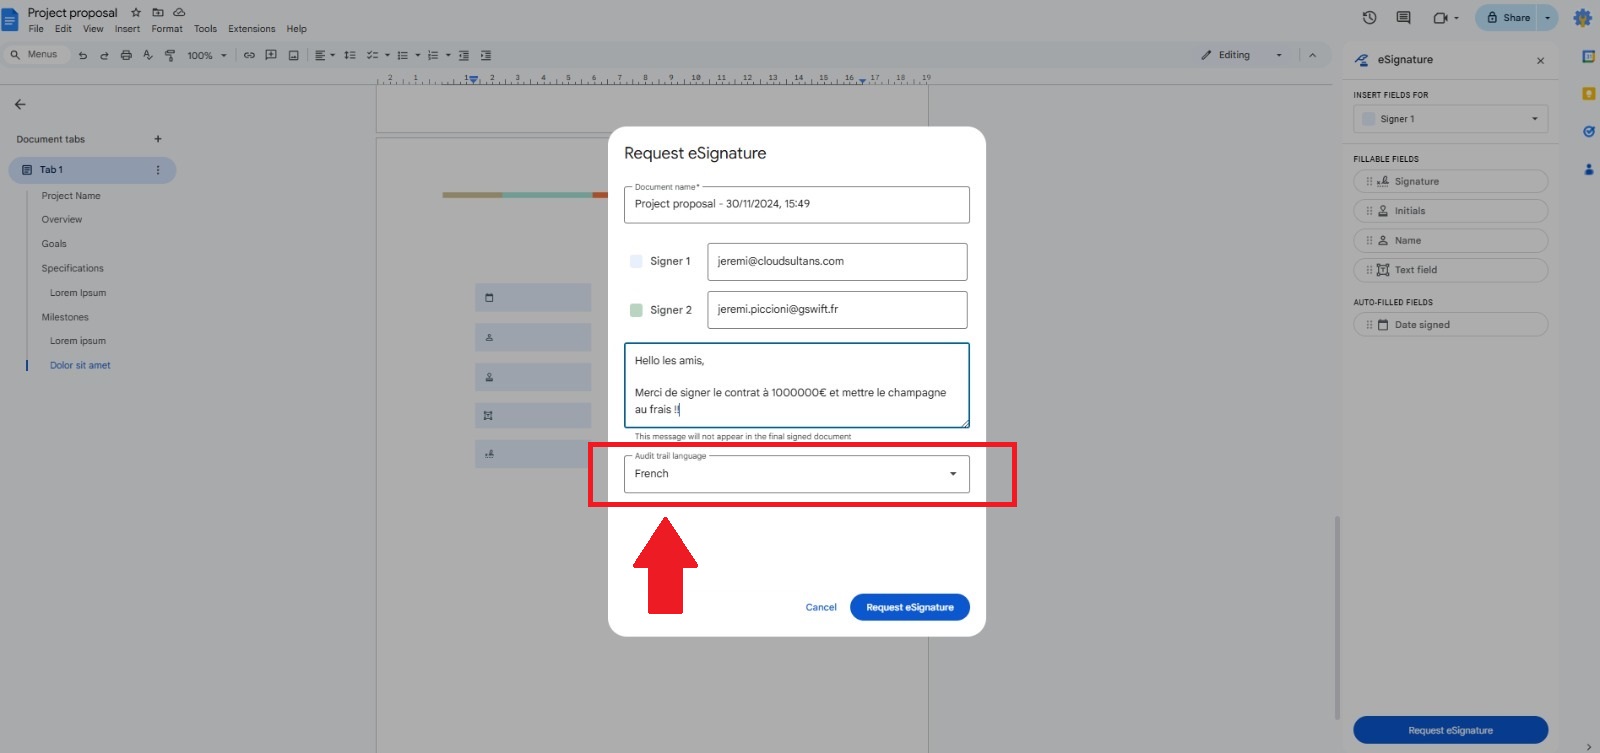
After setting up the fields, it’s time to request signatures by inputting recipient email addresses and adding optional notes. In the following example, we have two signers(Signer 1 and Signer 2), and each signer will fill in the details such as Date, Name, Initials, Text field, and Signature. After embedding the required fields for signers, we can now click on the “Request eSignature” option from the bottom right-hand corner, which will initiate the document-sending workflow and notify signers via email.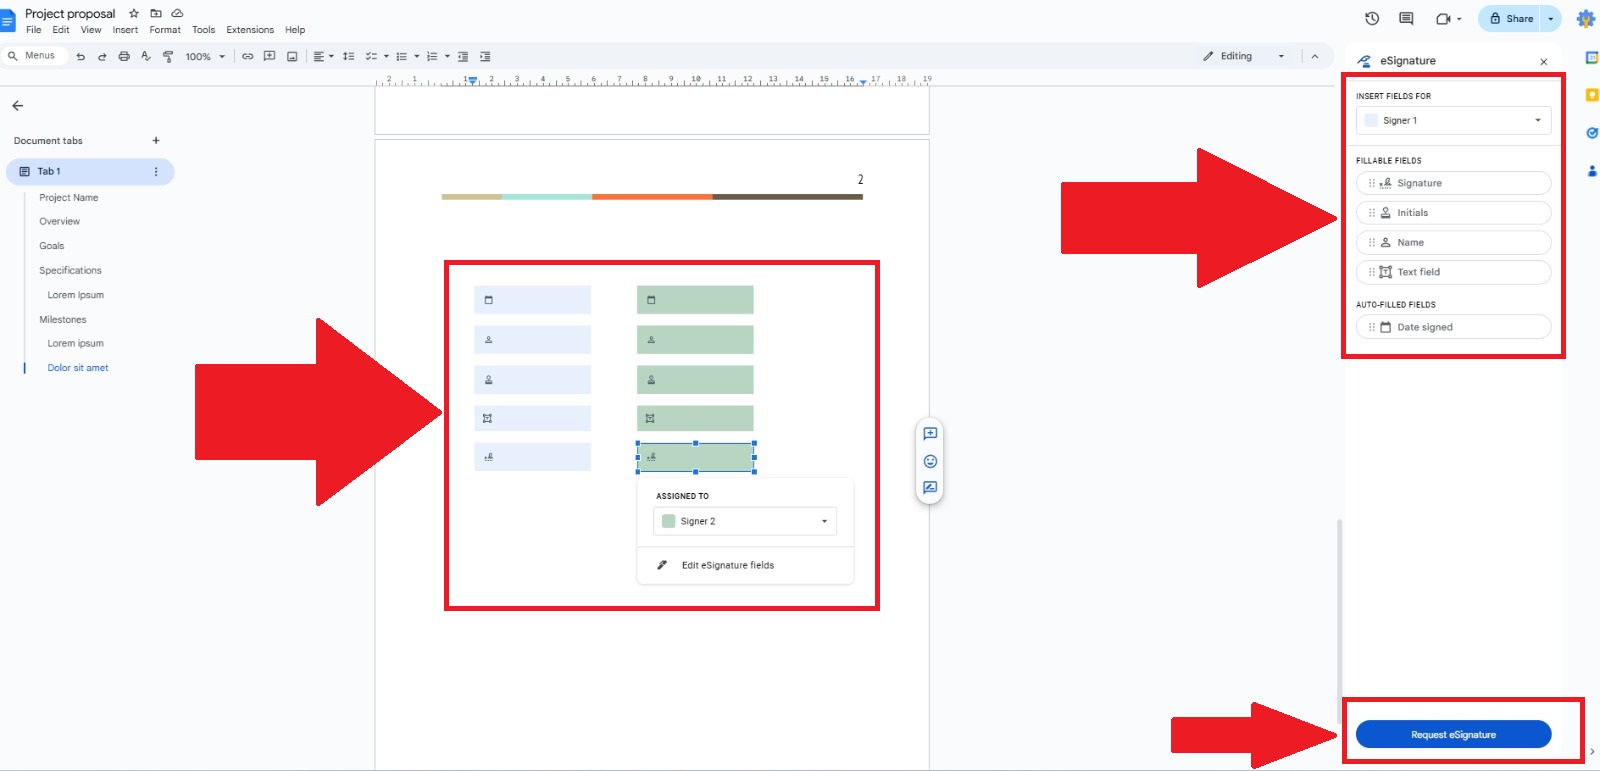
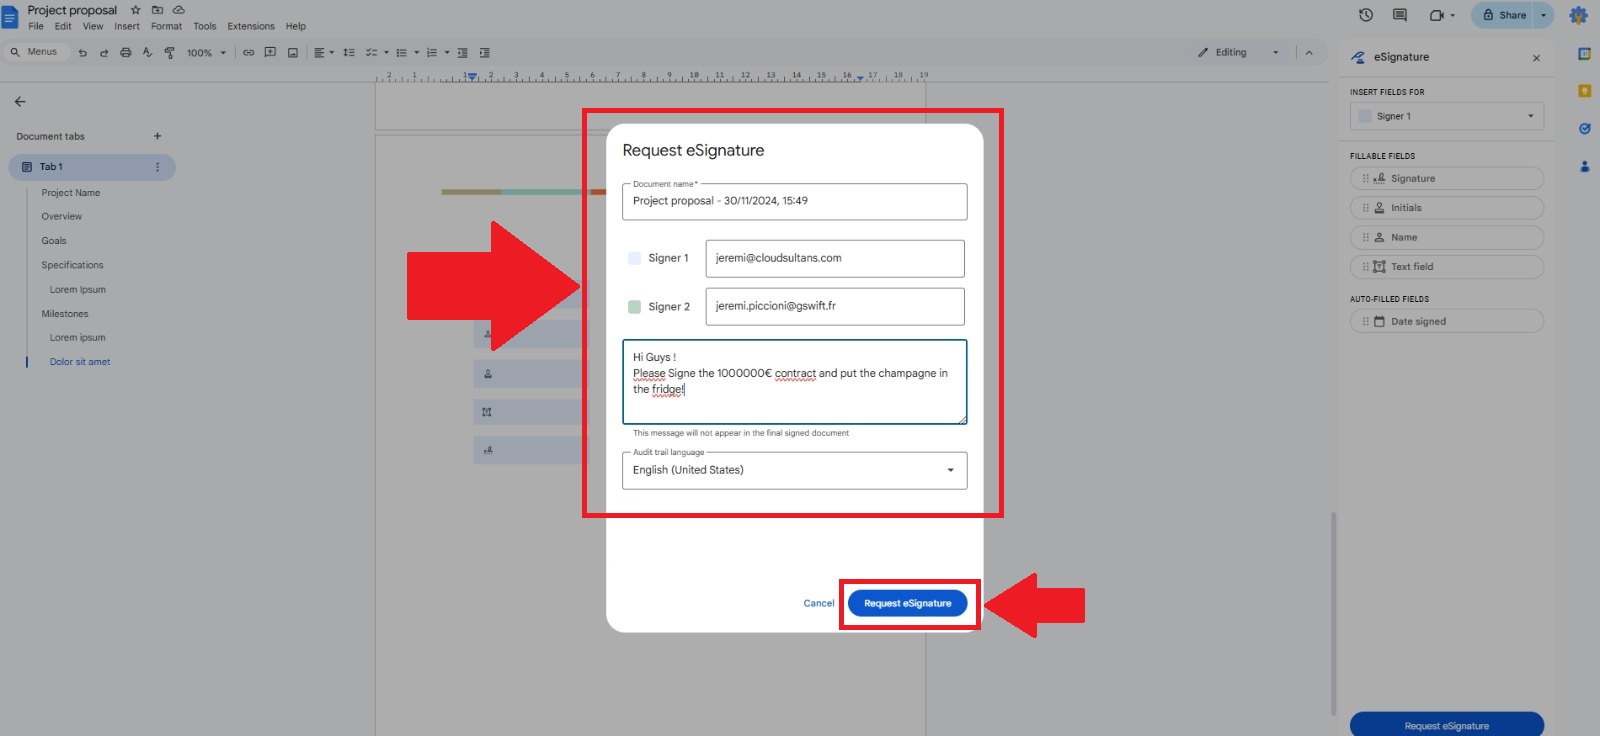
Clicking the “Request eSignature” should pop up the window below that is used to define the document title, signer email addresses, and the note. Additionally, you can specify the language that will be used while sending the document. Below two screenshots below represent the English and French versions of the eSignature request.
English Version:
French Version:
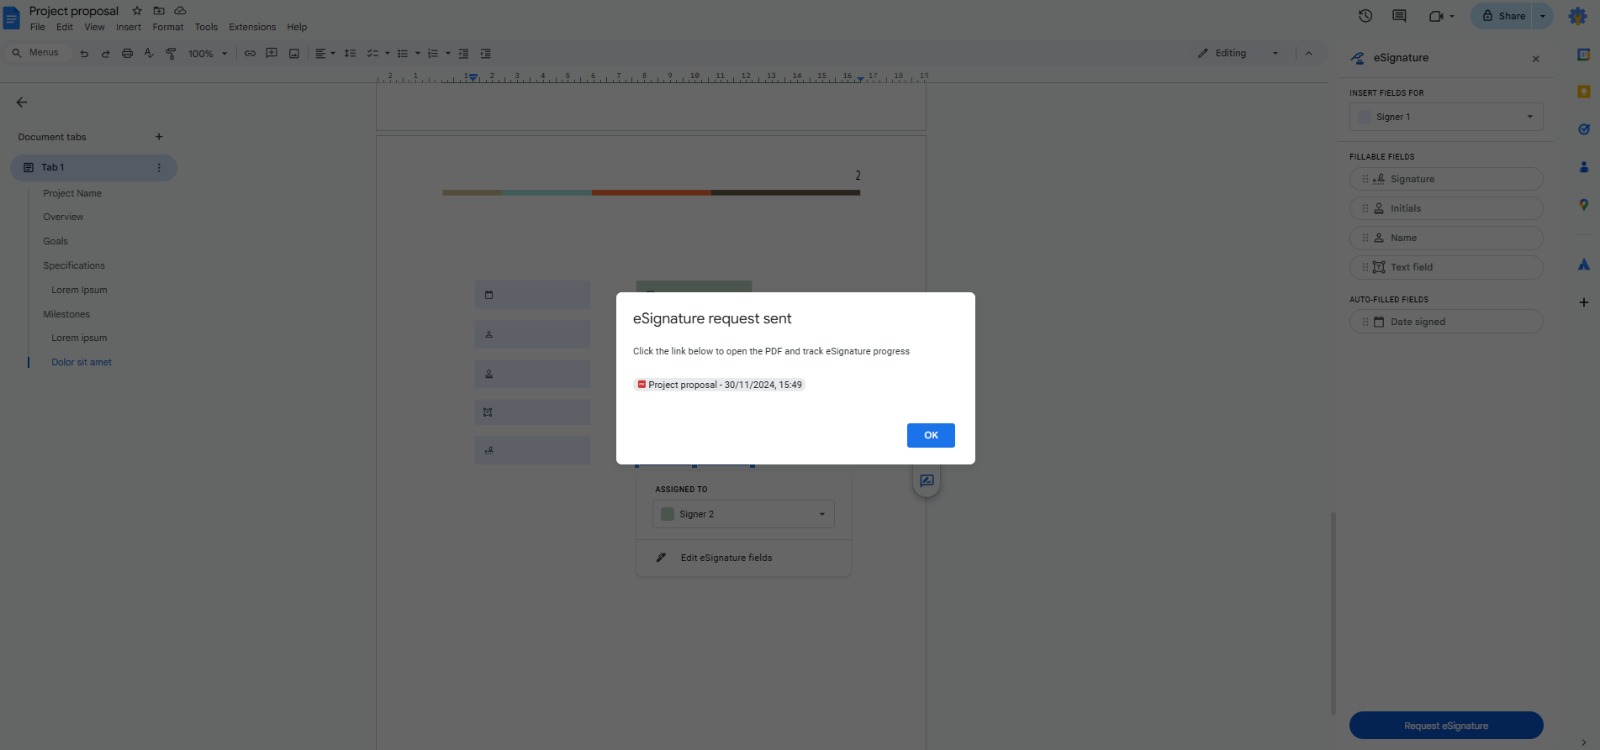
After filling in the necessary information, when you click on the “Request eSignature” option, Google Docs generates a secure, non-editable PDF, ensuring the document remains unchanged after signing. The Google Doc interface should show you the confirmation that the eSignature request has been sent and will also give a PDF link to see the eSignature document in PDF version that is useful for tracking the eSignature progress. This PDF format is a crucial feature, as it prevents unauthorized modifications and maintains document integrity, providing users with peace of mind when collecting digital signatures.
✅ User Experience: Signing the Document as a Recipient
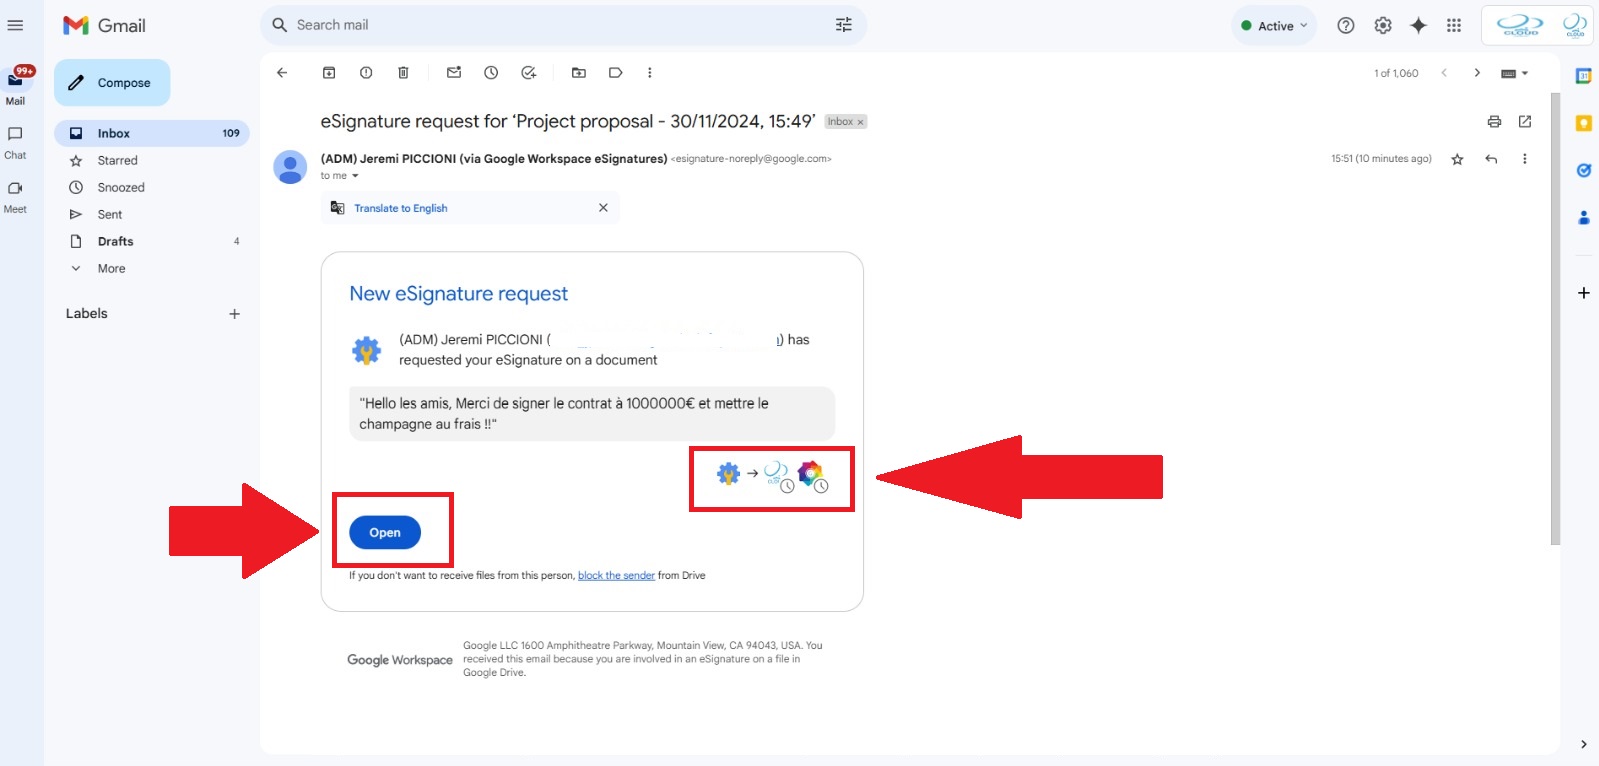
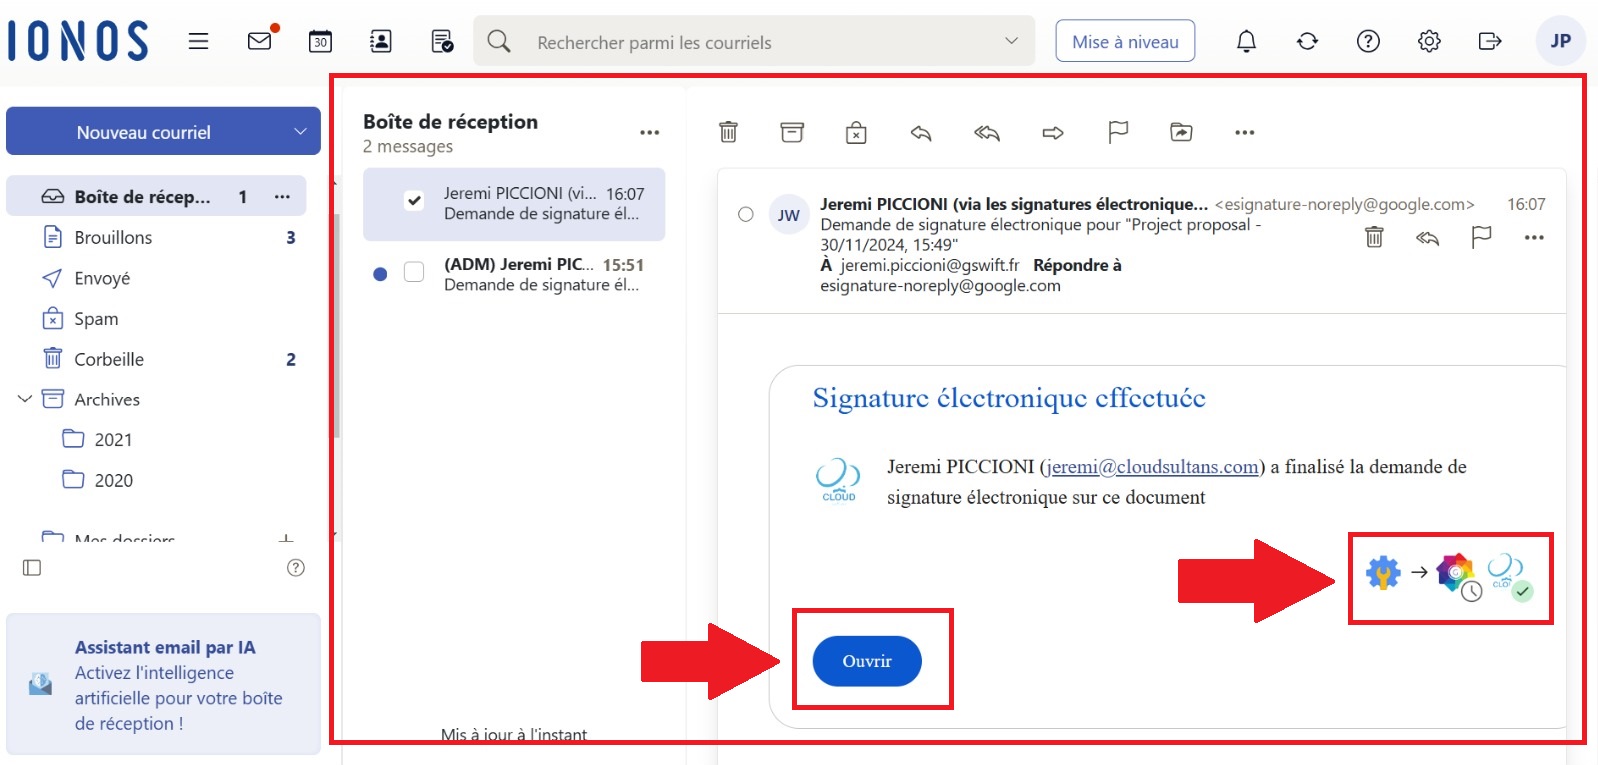
Signers will receive an email prompting them to open the PDF, review the document, and sign the designated fields. Recipients don’t need a Google account to sign. In our example from above, let’s assume that first eSign will be executed by jeremi@cloudsultans.com using a Google Workspace account so jeremi@cloudsultans.com should be receiving an email like below. The email includes the link to the PDF to the bottom right side of the email body and the bottom left side of the email body shows the progress about signers. In the screenshot below, you can see that signing is still pending by both signers.
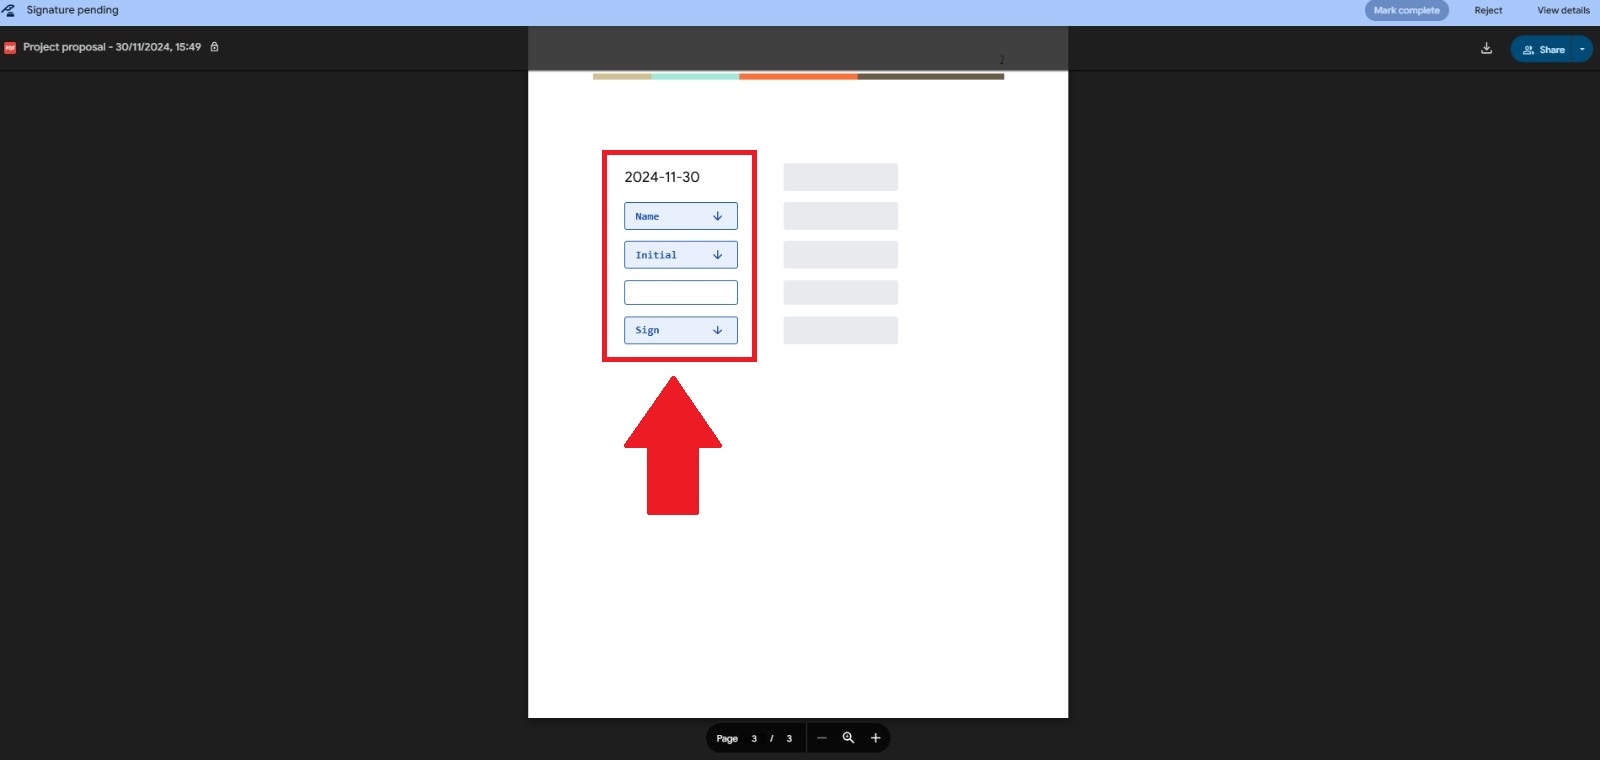
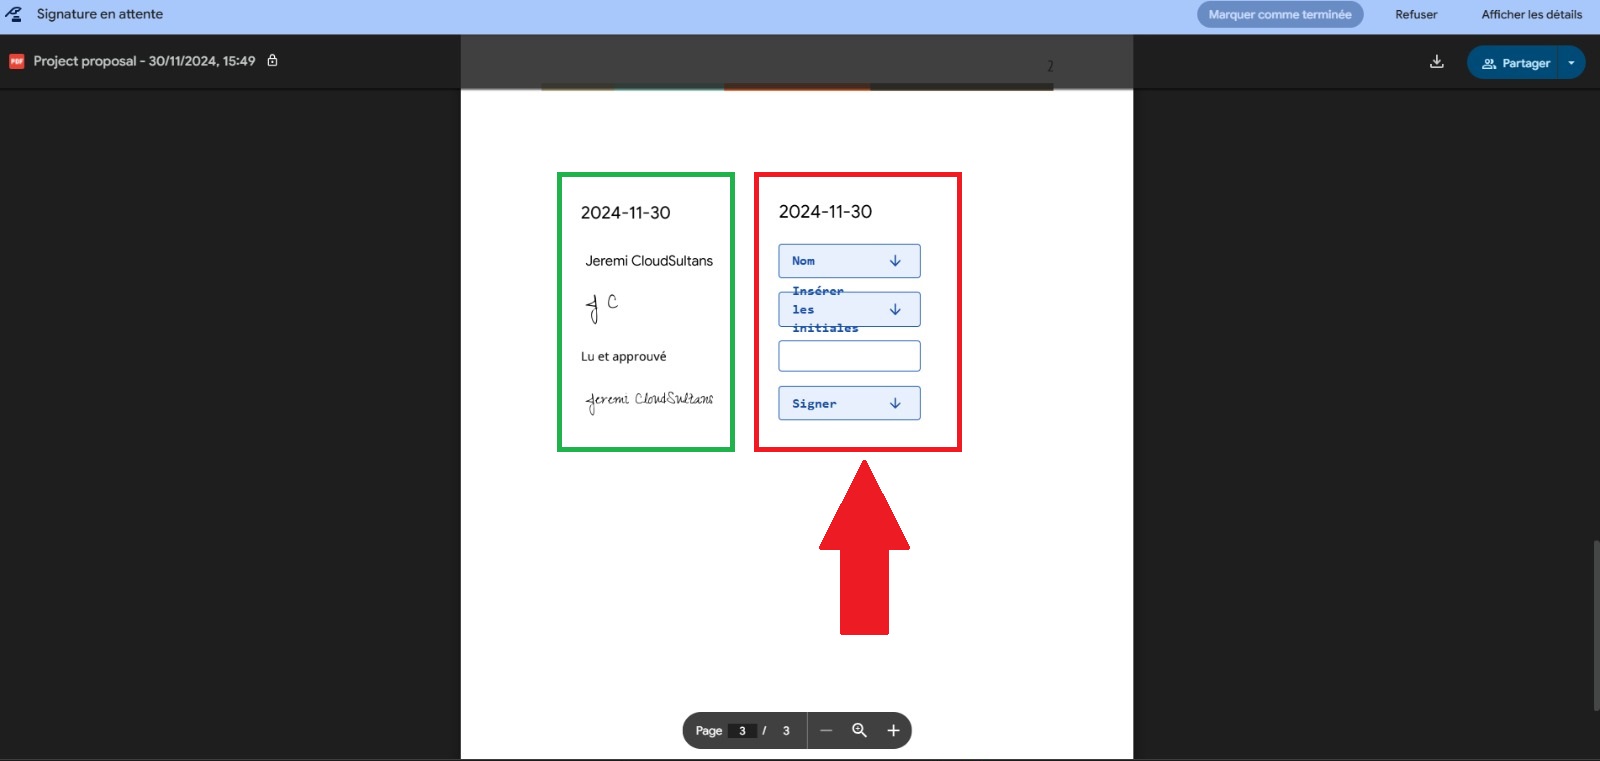
Now the first signer (jeremi@cloudsultans.com) will eSign the document by inserting the requested eSign details. In our example, jeremi@cloudsultans.com has to click on the “Open” option visible in the previous screenshot and it will open the PDF to eSign. We need to navigate the eSign fields from the PDF and then fill in the necessary details such as Date, Name, Initials, Text fields, and Signature. Following is the example where you can notice that the first signer can fill in the eSign details on the right-hand side of the page because the eSign fields on the left-hand side will be signed by Signer2 (jeremi.piccioni@gswift.fr).
Now Signer1 has to click on the eSign field that will open a new window as shown below. In this area, signer can add the requested fields and review it before signing it.

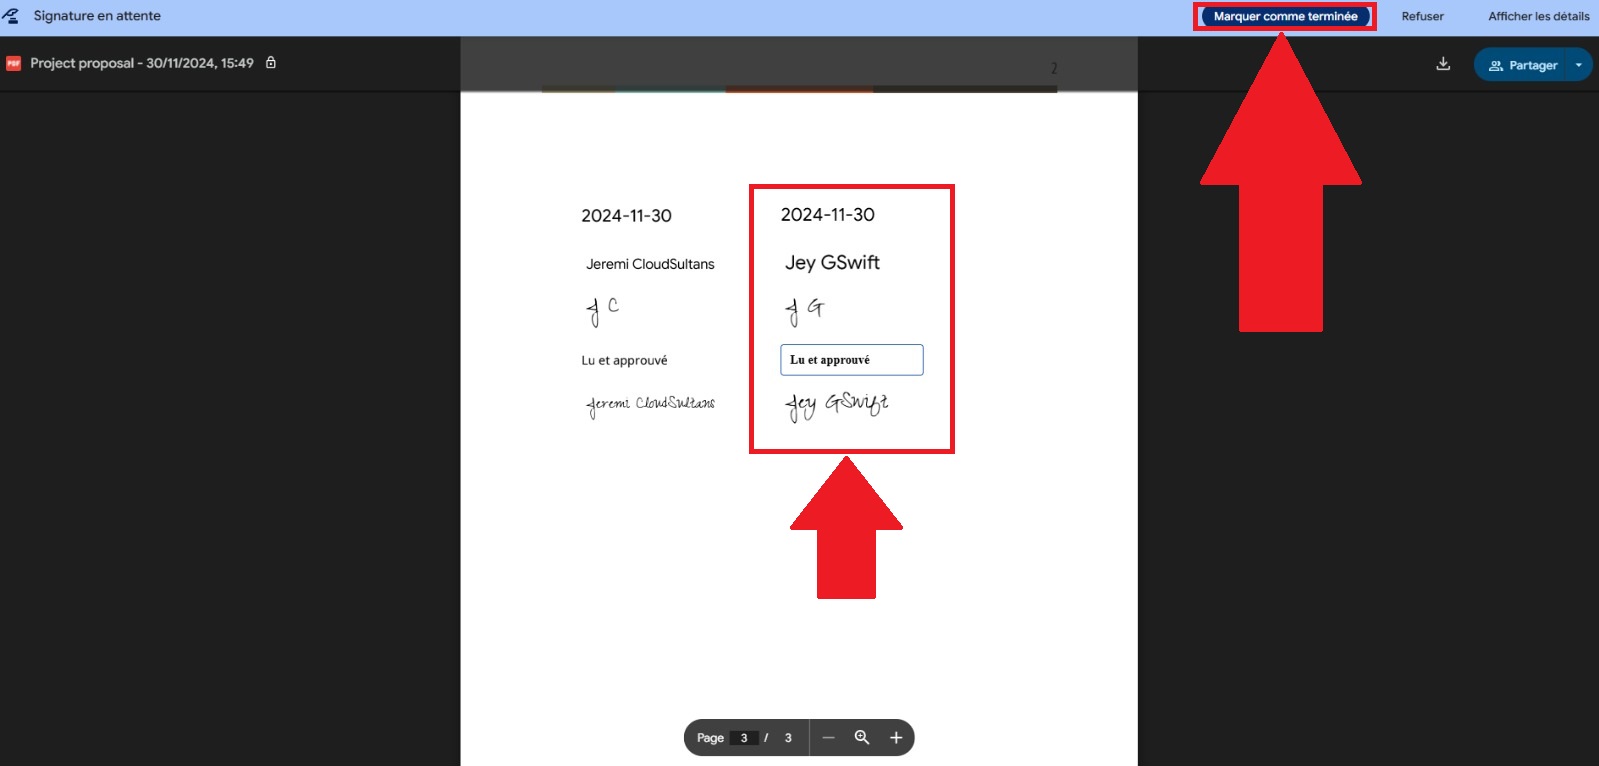
After filling up the details, it should look like below, the signer can now click on the “Adopt and sign” option to save the details. This will ensure that the document is ready to adopt a digital signature, and other details. Google Workspace has made this step simple and accessible, requiring no additional software or apps.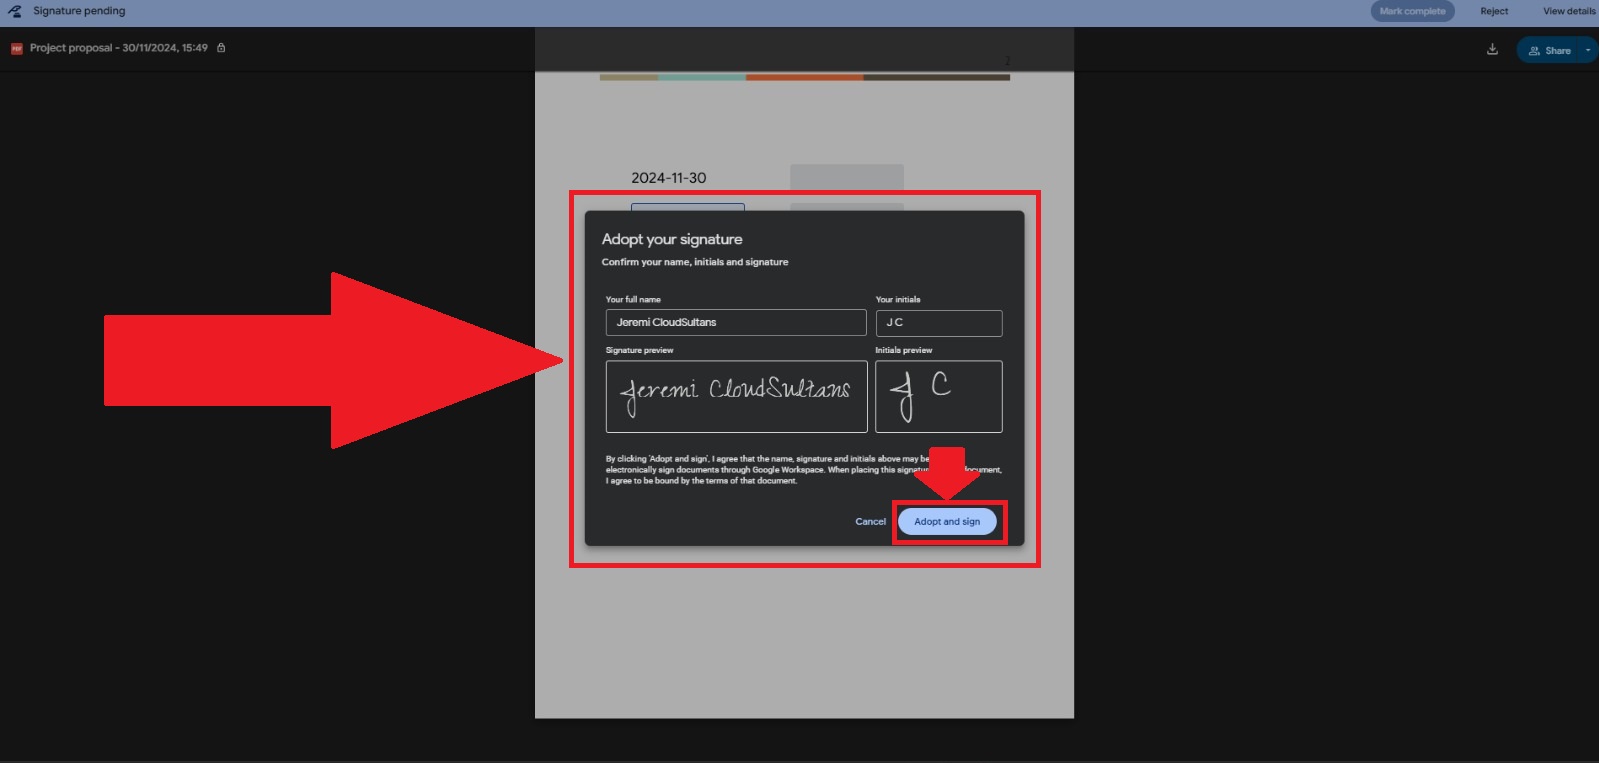
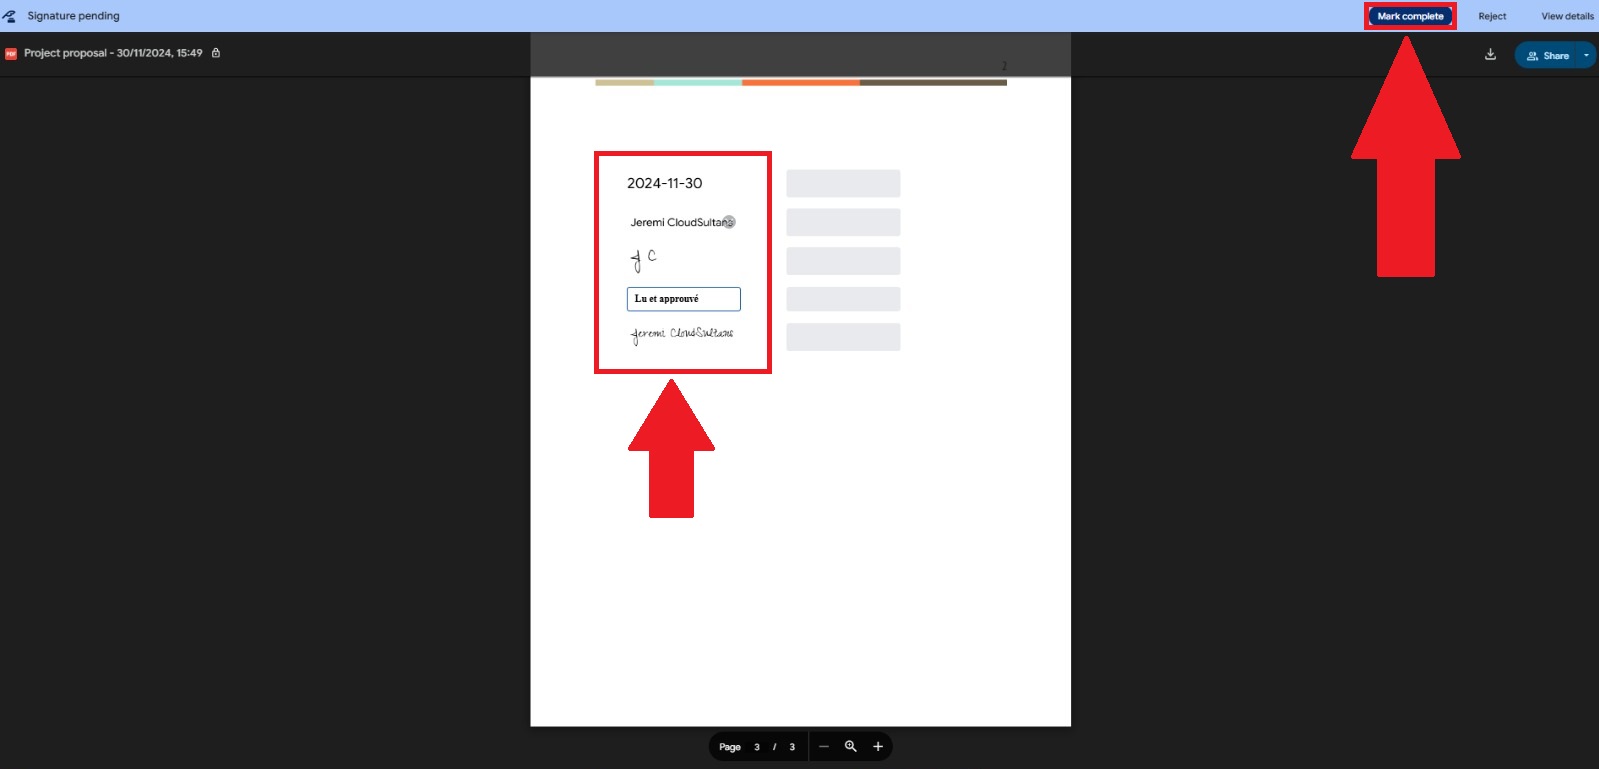
Recipients must also mark the document as “Complete” to finalize the signing process. After executing the above instructions, the PDF will let you preview the details before finalizing it. Once your review is done, simply click on the “Mark Complete” option from the top-right corner to complete the signing process.
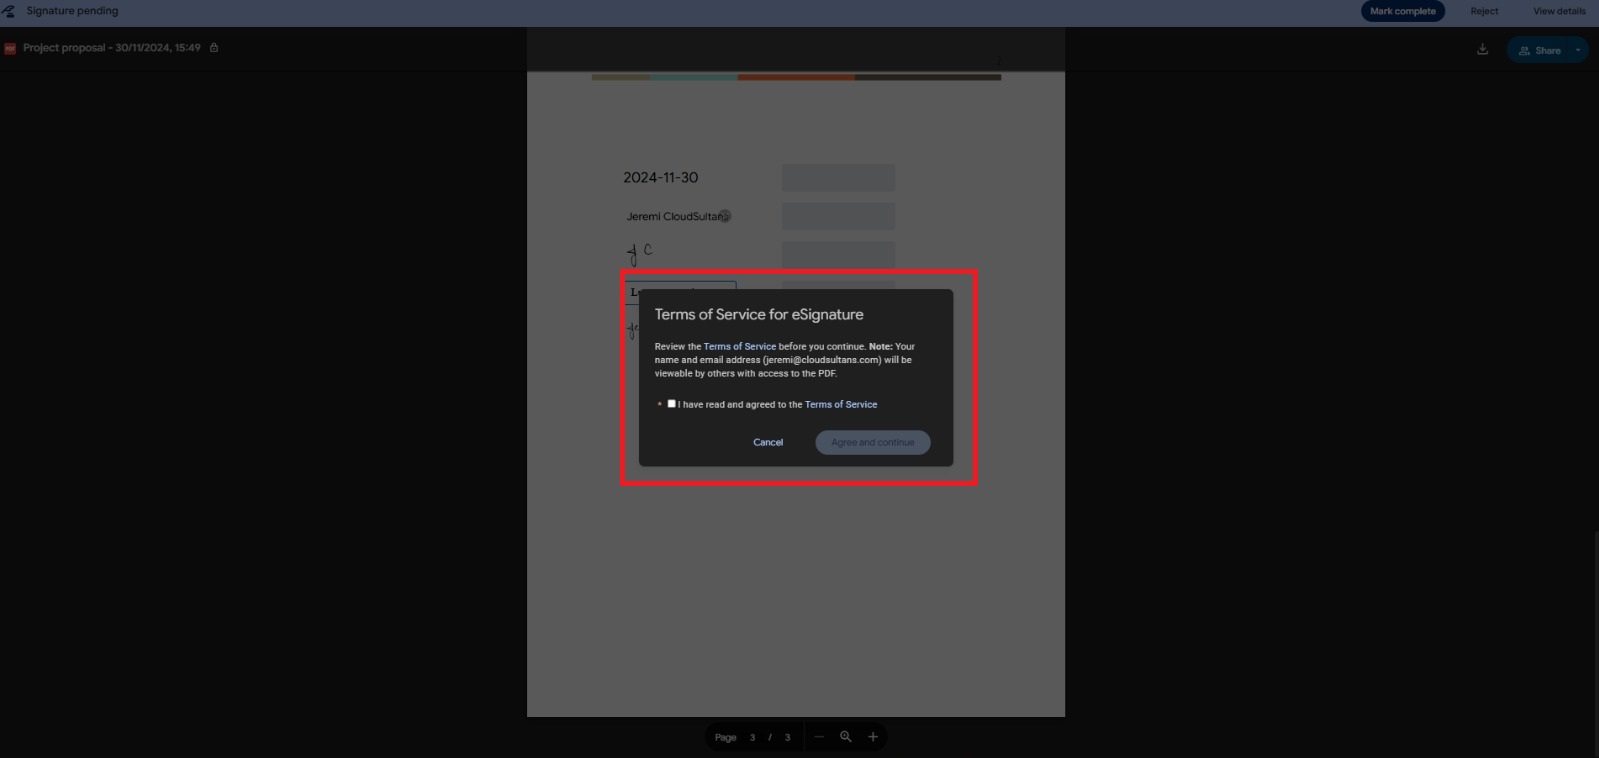
Please follow the on screen instructions for accepting the “Terms of Service” by enabling the checkbox and then click on the “Agree and continue” option.
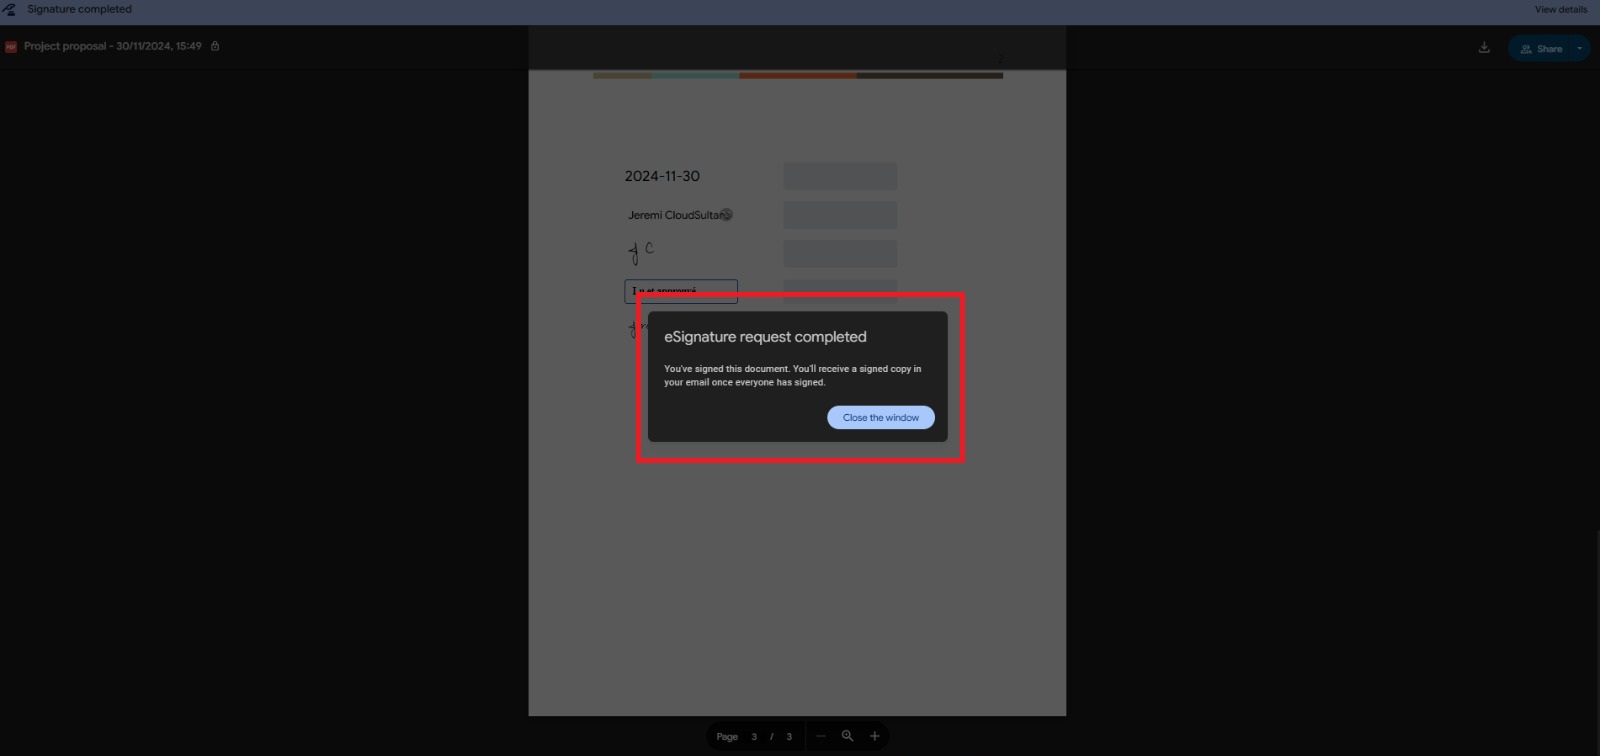
Upon successful completion, the new pop up window will appear stating that “eSignature request completed” and now you can close the window as the signer process is successfully completed for first signer.
In our example, the second signer(jeremi.piccioni@gswift.fr) will also get an email about the eSign request along with the progress status. In our case, we are assuming that Signer2 is using a third-party email server instead of a Google Workspace account and eSign still works the same. Carefully look at the following screenshot, you can see that jeremi.piccioni@gswift.fr has received an email in the same fashion as Signer1(jeremi@cloudsultans.com) with a small difference in the progress status bar shown in the right-hand corner of the email body. The progress bar will help to confirm that eSign progress by Signer1 is completed.
Now the second signer will open the document and can see the eSign fields that the second signer has to fill along with the previous eSign fields from the first signer.
In our example, Signer2 can fill all pending eSign details and proceed with the completion. Following is the eSign document workflow executed through a non-Google account, still the same as a Google account.
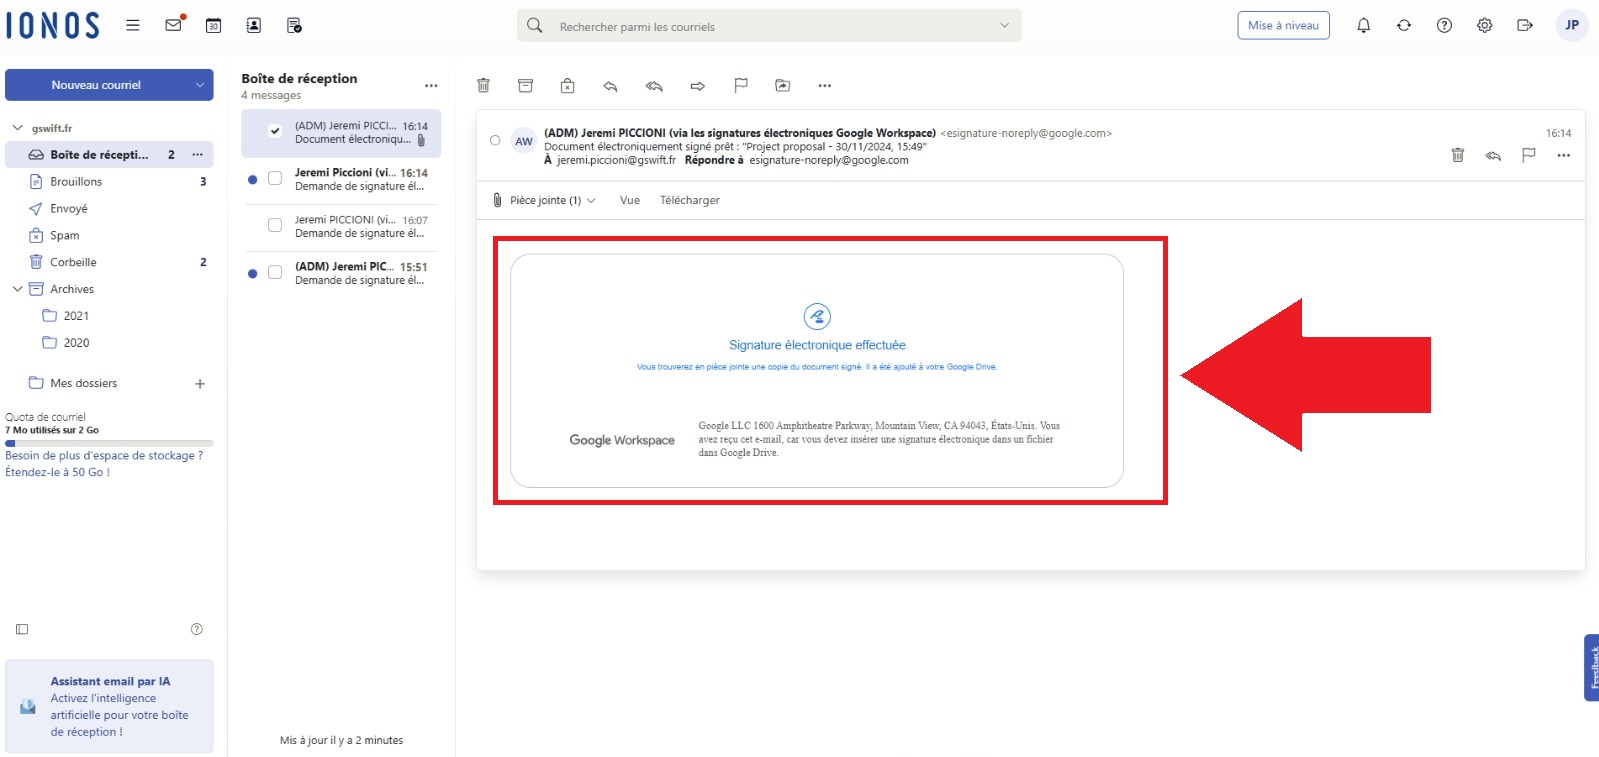
Final email notification confirming that all signers have signed the document and the eSign document workflow is completed successfully.
Email example:
Document example:

🕒 Completion Notifications and Document Audit Trail
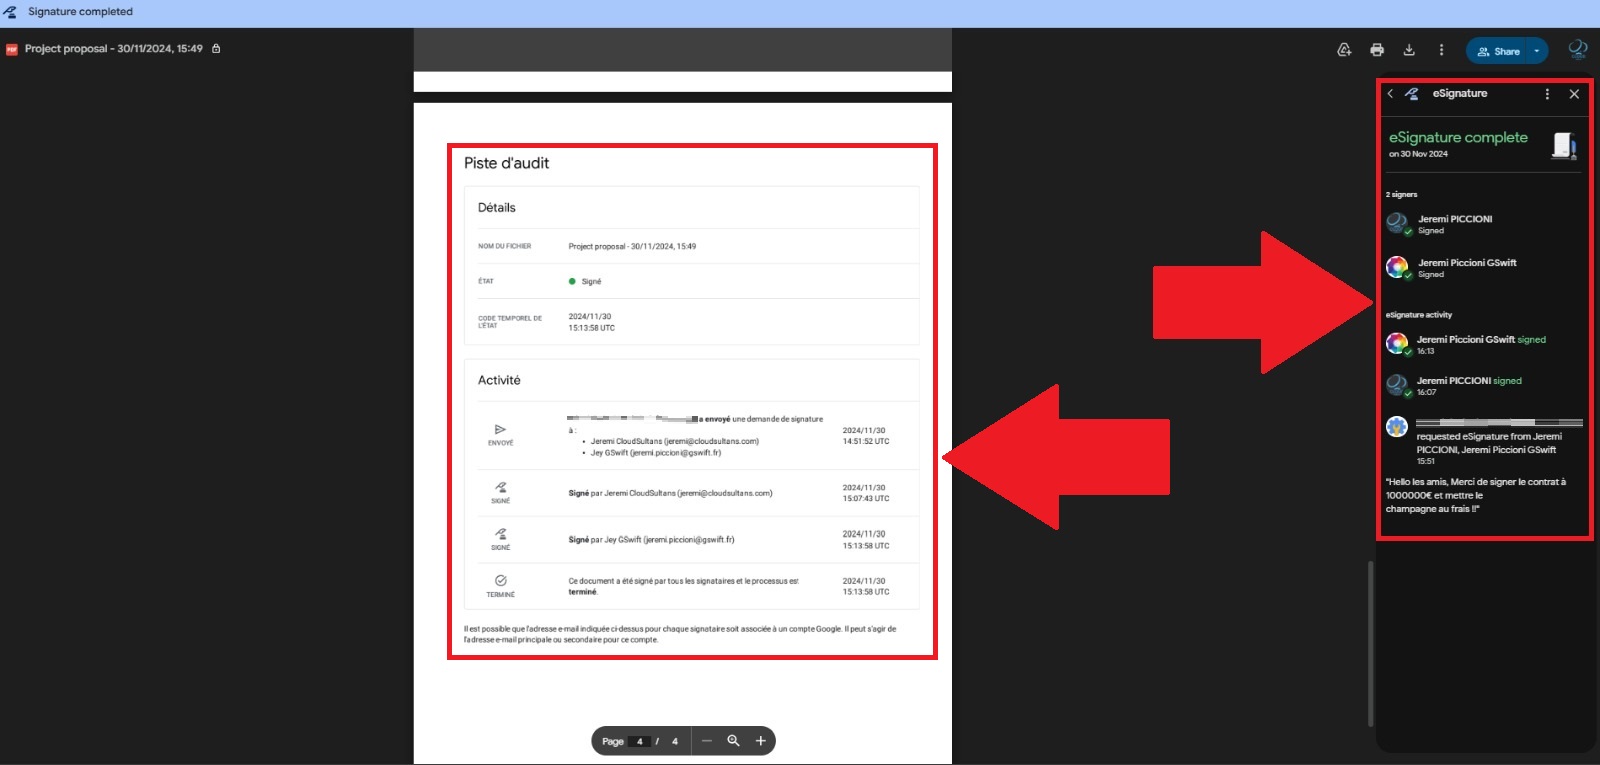
Once all parties have signed, the sender and recipients receive the final signed PDF, complete with an audit trail documenting who signed and when. This audit trail, accessible directly in Google Docs, provides a detailed history of the signing process, enhancing legal enforceability under standards in the U.S. and EU. This feature is an excellent addition for businesses needing digital documentation with official verification. You can observe the audit trail in the following screenshot which shows the activities in the same PDF file and on the right-hand side history brief is also visible.
📂 Managing Signed Documents in Google Drive
Signed documents are saved directly in Google Drive, although with a minor inconvenience: the PDF lands in the root folder rather than the original document’s folder. Users may need to manually organize these files. This extra step aside, Google’s eSignature solution keeps everything centralized within Drive, making it easy to track and access signed documents whenever needed.
⚙️ Limitations: No Bulk Sending or Automation Yet
Currently, Google Docs’ eSignature tool is designed for single documents, meaning there’s no bulk-send functionality or mail merge. While this setup is suitable for individual agreements, users with high-volume signature needs may need third-party solutions like DocuSign or HelloSign, which integrate seamlessly with Google Docs for larger-scale, automated workflows.
🔒 When to Use Google’s eSignature vs. Document Approvals
For external agreements, the eSignature feature in Google Docs is ideal. However, Google also offers “Document Approvals” for internal approval processes, ensuring that internal documents are finalized before public release. This approval workflow allows team members to review and approve documents without officially signing, helping teams finalize handbooks, newsletters, and other internal publications with ease.
Any questions, comments, or reactions about our article, we’re happy to hear that in the comment section below. We always love diving into healthy discussions. If you also feel that you haven’t been using Google Workspace at its best, reach us at (Cloud Sultans: contact@cloudsultans.com). We offer free consultation or system audit to find you the best possible solution.