One of the most powerful new features in Google Calendar, inspired by Calendly, is the ability to create a public-facing booking page. This functionality can streamline the process of scheduling appointments, allowing your customers or vendors to book time with you without the back-and-forth hassle of emails or calls. Here’s how to set it up effectively. At Cloud Sultans, our mission is to help small and large businesses to better collaborate and achieve high productivity with their teams by maximizing the power of Google Workspace (formerly GSuite).
Understand the Appointment Scheduling Feature
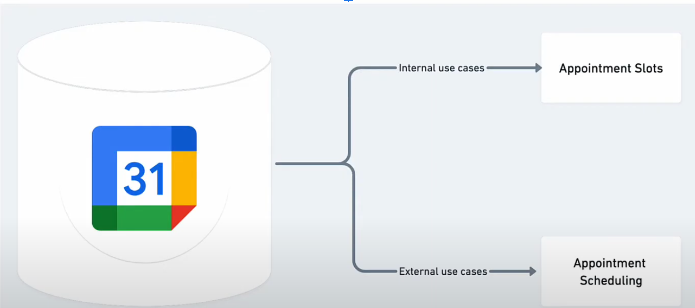
Google’s new appointment scheduling feature differs significantly from the traditional appointment slots. While the latter is typically designed for internal use, the new feature allows you to share your availability with external parties, such as customers and vendors. This means you can create a seamless booking experience that reflects your availability, which is particularly beneficial for all types of businesses looking to optimise their time management.

Verify Your Eligibility
Before diving into the setup, it’s essential to confirm that your Google Workspace account is eligible for this feature. Appointment scheduling is available for Google Workspace Business Standard, Business Plus, Enterprise, and Education editions. If you are still using a personal Gmail account, you will need to upgrade to Google Workspace Individual to access this functionality. Knowing this upfront will save you time and ensure you have the right tools at your disposal.

Access Google Calendar
To start creating your booking page, navigate to Google Calendar. Click on the app launcher in your Gmail and select Calendar. Once there, you will find the “Create” button. After clicking it, look for the new option titled “Appointment Schedule.” This is where the magic begins, enabling you to set your booking preferences and customise your page.

Set Your Availability
Creating your booking page starts with defining your availability. You can specify the days and time slots you are open for appointments. For example, if you want to be available from 3 PM to 3:30 PM on weekdays, simply select those times and copy them across the weekdays. This step is crucial as it helps manage customer expectations and ensures you’re only booked when you can meet.

Define Booking Parameters
Next, determine the booking parameters, including the scheduling window and advance booking limits. You can choose how far in advance appointments can be scheduled and the minimum notice required before a booking. For instance, if you prefer a 12-hour notice, set it accordingly. This flexibility helps you prepare better for each appointment and manage your schedule effectively.

Customize Your Booking Page
Your booking page’s appearance and the information it collects can be tailored to fit your needs. You can include a description of the service offered, set the meeting location (like Google Meet or a physical address), and even add customised questions to gather specific information from your clients. This step enhances the user experience and ensures you receive all necessary details ahead of time.
Set Up Reminders and Confirmation
To ensure your customers don’t forget their appointments, configure email reminders. You can send custom reminders at different intervals (like three days, one day, and one hour before the appointment). This proactive approach minimizes no-shows and keeps your schedule organized, allowing you to focus on your business without worrying about missed appointments.

Test the Customer Experience
Once your booking page is ready, it’s vital to test the customer experience. Open an incognito window and navigate to the booking page link. This gives you a firsthand view of what your clients will encounter. You’ll see your name, photo, and all the details you configured. Testing this step helps identify any issues or areas for improvement before you start sharing the link with your customers.
Share Your Booking Page
After ensuring everything is in order, share your booking link with your customers. You can integrate this link into your email signature, on your website, or through social media. This makes it easy for clients to book appointments with you, enhancing customer convenience and improving your business’s efficiency.
For more help on Google Calendar click here for support article.
Bonus: Customize Your URL
To make your booking link even more user-friendly, consider creating a custom URL that reflects your brand. If you own a domain, you can set up a CNAME record that directs to your Google Calendar booking page. This not only looks professional but also makes it easier for clients to remember and access your booking page.
Creating a Calendly like booking page with Google Calendar can significantly enhance your appointment scheduling process. By following these steps, you can offer a seamless and professional experience to your customers, freeing up time for other essential aspects of your business.
Any questions, comments, or reactions about our article? We’re happy to hear that in the comment section below. We always love diving into healthy discussions. If you also feel that you haven’t been using Google Workspace at its best, reach us at (Cloud Sultans: contact@cloudsultans.com). We offer free consultation or system audit to find you the best possible solution.