Securing sensitive organizational data in Google Workspace is more crucial than ever. One of the most effective ways to bolster your security is by leveraging Context-Aware Access to block or restrict access based on users’ geographical locations, IP addresses, and device IDs. This guide will show you how to implement country-based restrictions effectively, ensuring that your team’s productivity isn’t compromised.
At Cloud Sultans, our mission is to help small and large businesses better collaborate and achieve high productivity with their teams by maximizing the power of Google Workspace (formerly G-Suite).
What is Context-Aware Access? 🔐
Context-Aware Access is a Google Workspace feature that allows admins to create access policies based on user identity and context. These contexts include geographical location, IP address, device type, and more. By using these conditions, businesses can ensure that only authorized users can access specific apps or services from approved locations or devices.

Benefits of Using Context-Aware Access (CAA) 🌟
- Enhanced Security: Protect sensitive data from unauthorized access by restricting it to trusted regions or networks.
- Regulatory Compliance: Meet industry regulations by implementing location-specific access controls.
- Operational Flexibility: Ensure employees working remotely can securely access necessary resources.
Access the Context-Aware Access (CAA) Settings in Google Workspace ⚙️
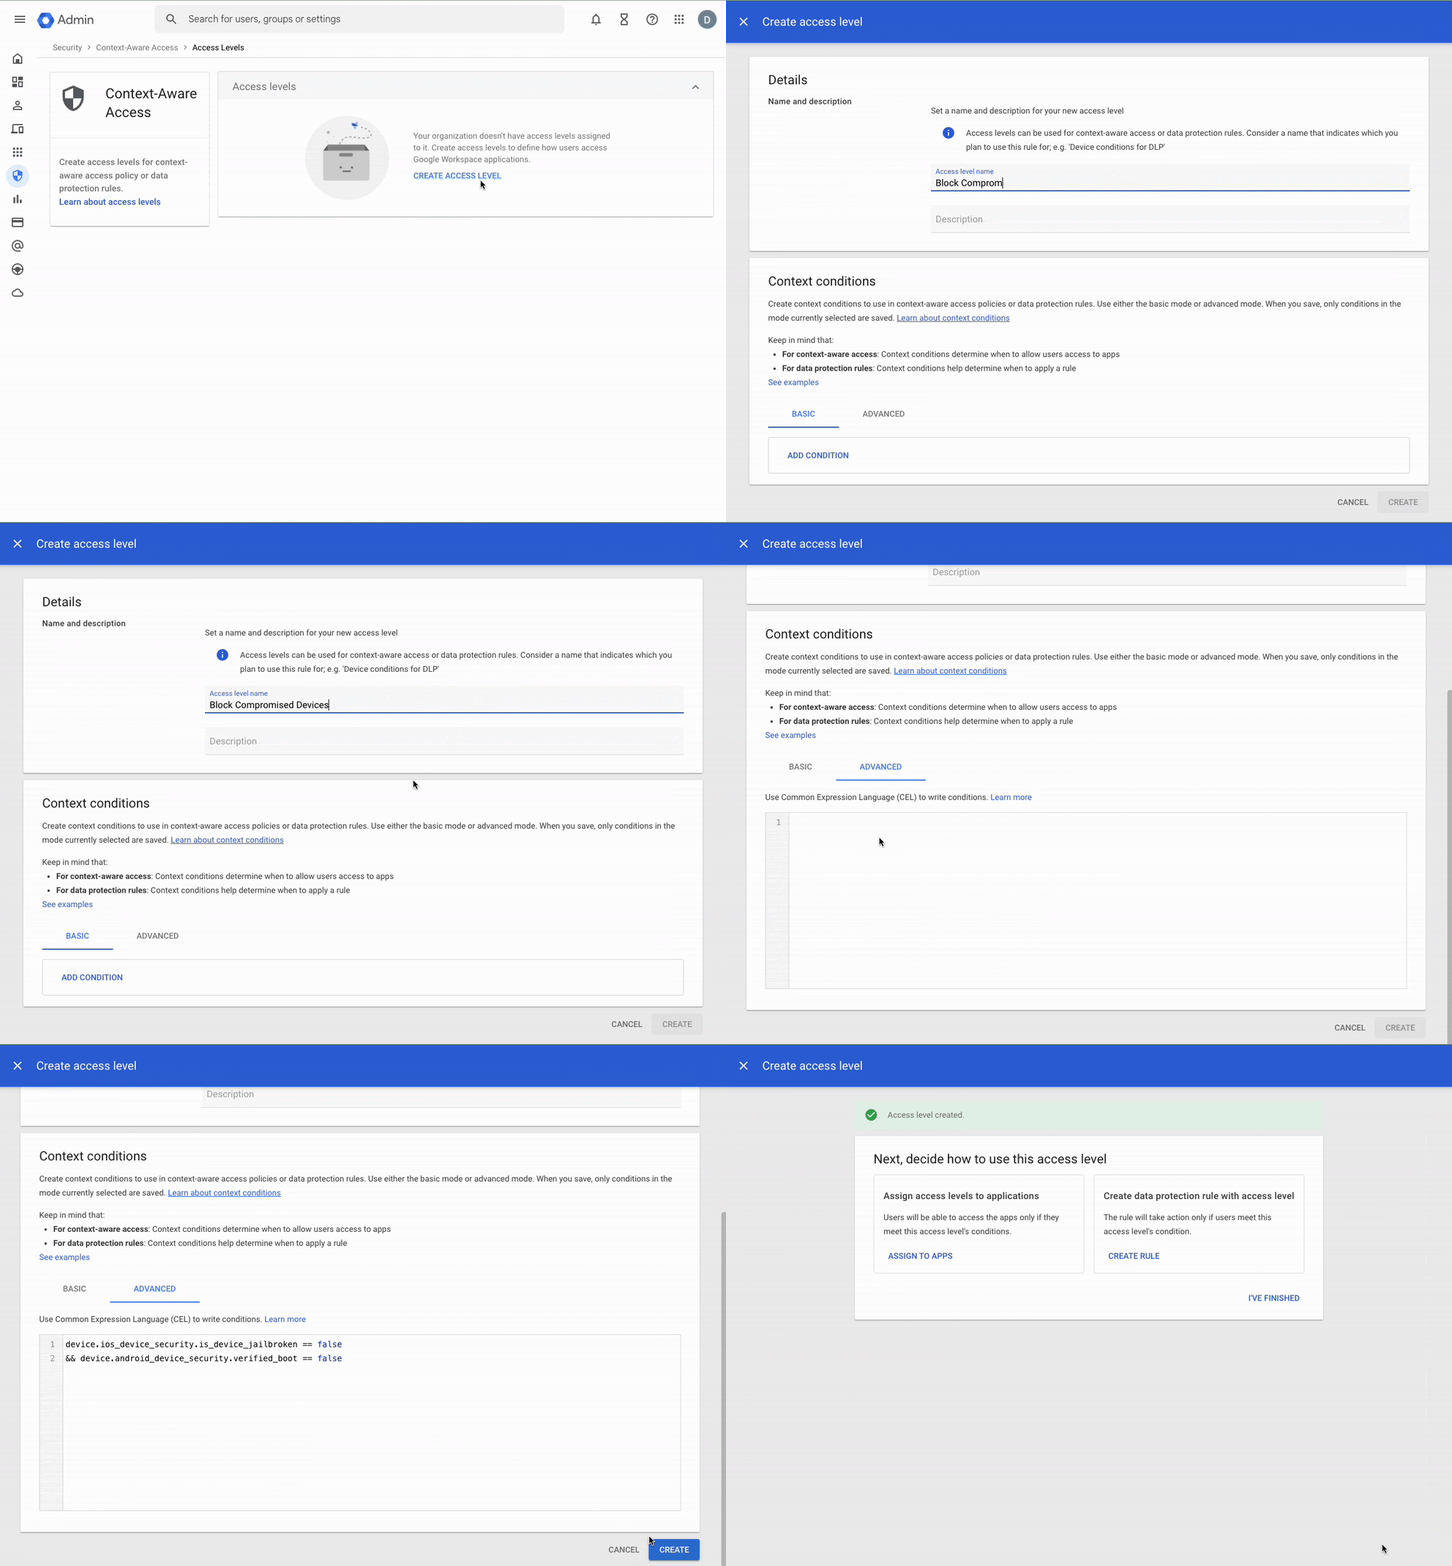
To begin setting up restrictions, navigate to the Google Admin Console. Under Security > Access and Data Control > Context-Aware Access, now you may need to « Turn ON » the CAA service if not done previously. If CAA service is activated, we need to expand the « Access Level » section to create the new CAA policy.

Once you click on the Access Level tab, you’ll find the option to « Create Access Level » and can also manage existing CAA policies, if previously added.

Creating Basic Location-Based Access Levels 📍
Start by defining an access level that specifies allowed or restricted regions. Go to Create Access Level and name the access level for clarity, such as « Condition | No Access from 3 Countries. »

Now you will see two sections, « Basic » and « Advanced ». For now, we will select the Basic section for easy explanation. Later in this guide, you will see a brief overview of Advanced CAA policy.

Use the multi-select dropdown to select the policy parameter. CAA allows you to choose one/multiple parameters as per your needs. The following are the supported parameters.
- IP Subnet
- Location
- Device
- Device OS
- Access Level
For example, we wanted to restrict access from China, Russia, and other specified countries, we need to set up the « Location » parameters and choose the appropriate region names.

Then you can click on « Create » to finish creating the CAA policy. Now, you can click on « I’M Done » option and then later « Assign policy to Apps » or « Create a rule with policy« .


Advanced Customization Using Common Expression Language 🖋️
If you need more complex rules, use Common Expression Language (CEL) for advanced configurations.
- Syntax example: Use
origin.region_code != ["CA", "CN", "RU"]to block access from Canada, China, and Russia. - Wrap conditions in parentheses and negate them with an exclamation mark for flexibility.
- Refer to Google’s documentation for detailed CEL guidance.

Assigning Access Levels to Google Workspace Apps 📧
After creating your access levels, assign them to specific apps like Gmail, Gemini, Drive, etc. In the Context-Aware Access menu, select the option named « Assign access levels to apps ».

Choose the correct end user audience using the OU or a Group option and then select the desired apps for which you want to apply the policy. Please be aware that you need to select all the applications that you would like to restrict access to. Assume that we are applying the policy for Gemini and Gmail.

Now choose the mode, « Monitor » or « Active » or both. In this example, we will select the Active mode to achieve the requirements.

Final stage of selecting the enforcement, and then you can finally review your policy and complete the assignment.


Addressing Common Challenges 🚧
Propagation Delays: Changes to access levels may take a few minutes to reflect. Patience is key during testing.
Error Messages: Enable remediation messages to help users understand why they’re denied access and guide them toward resolution steps.
End user experience
When a Context-Aware Access (CAA) policy denies a user access, they’ll see a tailored error message. For instance, the message might state that « access is restricted « You don’t have access » due to location, device compliance, or network policy. These messages help users understand the issue and guide them toward corrective actions, such as updating their device settings or connecting from an approved location.

Navigate to CAA Logs for review of the related activities
As the administrator of your organization, you can monitor Context-Aware Access log events and respond accordingly. These logs allow you to investigate and resolve issues, such as understanding why a user was denied access to an application. Log entries typically become available within an hour of the denial, providing timely insights for troubleshooting.
Go to Menu and then Reporting > Audit and investigation > Context Aware Access log events.

Stay Ahead with Context-Aware Access 🚀
With these tools and techniques, you can strengthen your organization’s security posture and meet compliance standards without hindering your team’s efficiency. Context-Aware Access provides a powerful yet flexible way to ensure secure and seamless collaboration.
Any questions, comments, or reactions about our article? We’re happy to hear them in the comment section below. We always love diving into healthy discussions. If you also feel that you haven’t been using Google Workspace at its best, reach us at Cloud Sultans: contact@cloudsultans.com.


