Two-Factor Authentication (2FA) is a crucial security feature that adds an extra layer of protection to your accounts by requiring a second form of verification in addition to your password. It’s essential for safeguarding sensitive data, preventing unauthorized access, and mitigating risks like phishing and credential theft. Implementing 2SV in Google Workspace, whether for personal or professional use, ensures enhanced security, compliance with standards, and protection against common threats, making it a key practice for maintaining digital safety.
This way no one would be able to open your Google Account without your phone in the hand of the hacker.
At Cloud Sultans, our mission is to help small and large businesses to better collaborate and achieve high productivity with their teams by maximizing the power of Google Workspace (formerly GSuite).
In today’s digital landscape, Two-Factor Authentication (2FA) is a must-have security measure to protect user accounts and reduce the risk of phishing, ransomware, and unauthorized access. In this article, we’ll break down the steps and strategies to enable 2FA in Google Workspace effectively.
1. Accessing the Google Admin Console
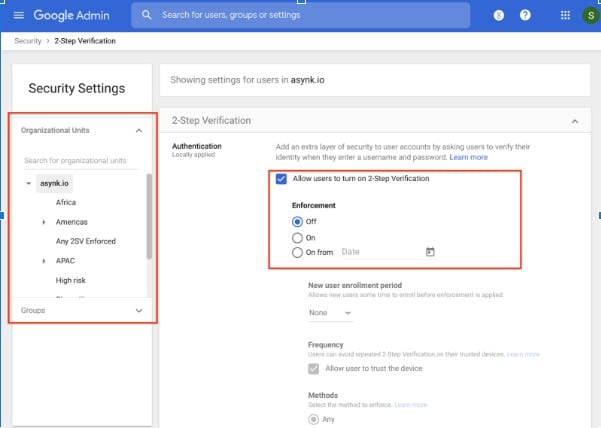
To get started, log into the Google Admin Console at admin.google.com using your admin credentials. Once logged in, navigate to Security > 2-Step Verification. This section houses all the options you need to configure 2FA settings for your organization. Understanding this central hub ensures a smooth implementation process for administrators.
2. Choose Who to Enforce 2FA For
You have two methods to enable 2FA for users: by Organizational Units (OUs) or Security Groups. For instance, if you manage a school, you might not want students to enable 2FA due to limited access to mobile devices. In such cases, focus on enabling it for staff or specific groups like “Secure Users.” Security Groups are particularly helpful for mixed teams spread across different OUs, giving you flexibility and control.

3. Start with Optional 2FA for a Smooth Rollout
To minimize disruptions, start by allowing users to enable 2-Step Verification (2SV) voluntarily. In the Admin Console, select the option to “Allow users to turn on 2-Step Verification.” This approach allows you to test the process with a small group of trusted team members. Encourage them to set up 2SV, gather feedback, and address any issues before rolling it out organization-wide.
In Google Workspace (formerly G Suite), users can only set up 2SV for Gmail and other Google services if the administrator activates it. Here’s how the setup works:
Admin Setup
- The Google Workspace admin logs into the Admin Console.
- Navigate to Security > Authentication and enable 2SV for the organization or specific groups.
User Setup
- Once 2SV is enabled, users can access their Google Account settings under Security to configure it.
- Users can choose their preferred authentication methods, such as the Google Authenticator app, SMS, or a security key.

This step-by-step approach ensures flexibility for users and centralized control for the organization, making the transition to 2SV smooth and effective.
4. Set a Clear Enforcement Date
When you’re ready, enforce 2-Step Verification (2SV) across the organization. In the Admin Console, enable the Enforcement option under 2SV settings and set a clear compliance deadline.
Best Practices for Enforcement:
- Communicate Early and Often: Inform users about the enforcement date through emails, team meetings, and reminder notifications to ensure everyone is aware and prepared.
- Grace Period: Set a “soft” enforcement date before the official deadline. This allows users time to set up 2SV and helps identify those who haven’t complied.
This approach ensures a smoother transition while maintaining strict security policies.

5. Explore Multiple 2FA Methods
Google Workspace offers various 2 Factor Authentication (2FA) options, allowing users to choose what works best for them:
- Google Prompt: A quick pop-up asking, “Are you trying to sign in?” – fast and hassle-free.
- Authenticator Apps: Install apps like Google Authenticator for offline code generation.
- Backup Codes: One-time printable codes for users who prefer not to use personal devices.
- SMS Codes: Text-based verification (less reliable due to cell network issues).
- Security Keys: Physical USB keys for advanced security.
Encourage users to set up at least two methods for redundancy. This ensures they’re never locked out of their accounts.

6. Monitor 2FA Enrollment with User Reports
To ensure compliance, utilize the User Reports in the Admin Console. Navigate to Reports > Security and filter for users who haven’t enrolled in 2FA. This report gives you clear visibility into who needs follow-up. A proactive approach helps you address issues individually before the final enforcement date, minimizing disruptions.
7. Allow Users to Trust Their Devices
One concern with 2FA is its perceived inconvenience. To mitigate this, enable the option for users to “Trust the Device.” This way, once users enter their second factor on a trusted device, they won’t be prompted repeatedly unless they switch devices or locations. This small step improves the user experience without compromising security.
8. Configure Grace Periods for New Users
For new staff or team members, it’s a good idea to provide a grace period (e.g., 15 days) to enable 2FA after account creation. This ensures they have sufficient time to set up their authentication method without feeling rushed or locked out during onboarding.
- Important Note: Clearly communicate that users who fail to set up 2SV within the grace period will be immediately locked out of their accounts. Since they won’t have the opportunity to configure backup options like a recovery email or phone number, it’s crucial to stress the importance of completing the setup on time to avoid access issues.

9. Communicate the Importance of Backup Codes
For users hesitant to use personal devices, backup codes are a lifesaver. These one-time printable codes allow users to access their accounts securely without relying on their phones. Keep these codes in a safe place, like a locked drawer, for emergencies.

To activate 2-Step Verification (2SV) for specific groups in Google Workspace, follow these steps:
10. Steps to Enable 2SV via Google Groups
- Login to Admin Console:
- Go to the Google Admin Console and sign in with your administrator credentials.
- Navigate to Security Settings:
- From the Admin Console homepage, go to Security > Authentication > 2-Step Verification.
- Set Group-Specific Rules:
- In the 2-Step Verification settings, click “Organizational Units” or “Groups” to customize settings for specific groups.
- Select the group for which you want to enable 2SV.
- Enable 2SV for the Group:
- Turn on the option to “Allow users to turn on 2-Step Verification” for the selected group.
- You can also enforce 2SV for this group by setting a compliance deadline.
- Communicate with the Group:
- Inform group members about the new 2SV requirement. Provide instructions on how to set up 2SV and a timeline for compliance.
- Monitor Compliance:
- Use the Admin Console’s reporting tools to track which users in the group have enabled 2SV.
- Enforce 2SV:
- After the grace period, enable “Enforcement” to lock accounts of group members who haven’t set up 2SV.
This targeted approach ensures that high-risk or critical groups adopt 2SV first, while allowing flexibility for other users.
Any questions, comments, or reactions about our article, we’re happy to hear that in the comment section below. We always love diving into healthy discussions. If you also feel that you haven’t been using Google Workspace at its best, reach us at Cloud Sultans: contact@cloudsultans.com.
We offer free consultation or system audit to find you the best possible solution.