At Cloud Sultans, our mission is to help small and large businesses to better collaborate and achieve high productivity with their teams by maximizing the power of Google Workspace (formerly GSuite).
Migrating your Google Workspace account—whether due to rebranding, restructuring, or just optimizing user management—can feel like a complex task. Fortunately, Google provides built-in tools that make it easier to move data like Gmail messages, Google Drive files, Docs, Sheets, and more between accounts. In this article, we’ll walk you through a comprehensive and simplified process to transfer Google Workspace data securely and effectively. Whether you’re a business admin, IT support, or just handling a one-time transfer, these tips will make the process smooth and stress-free.
Understand the Google Workspace Migration Use Case
Before diving into the technical steps, it’s important to understand why migrating Google Workspace accounts is essential. Businesses may need to transfer ownership of data when an employee leaves, a domain changes, or teams are consolidated. Migrating email and drive content ensures business continuity and avoids the risk of losing critical information. It’s not just about moving files—it’s about maintaining access, ownership, and compliance across your organization.
Access the Google Admin Console as a Super Admin
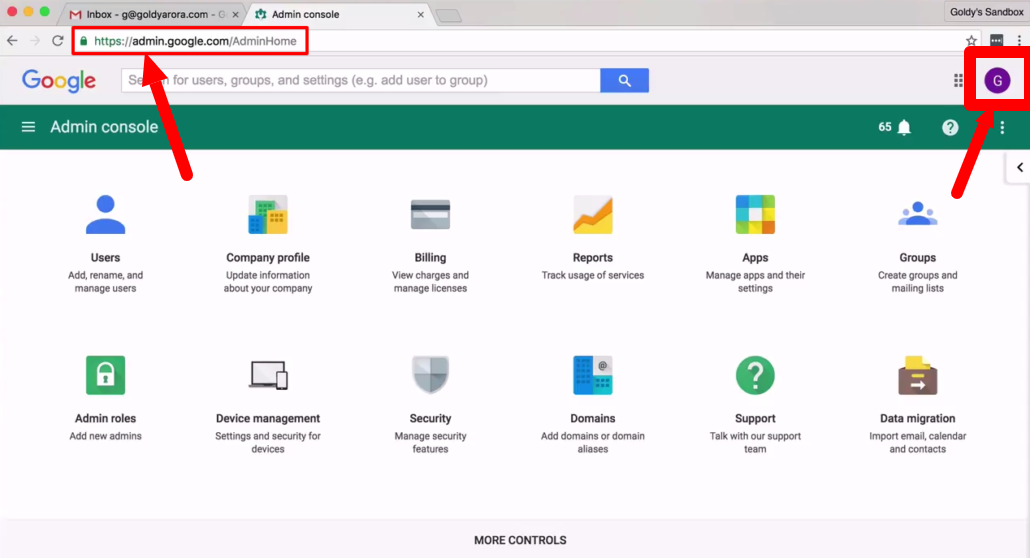
All Google Workspace migration tasks start at the Google Admin Console. This powerful backend allows administrators to manage users, apps, and data policies. To access it, visit admin.google.com and log in using an account with admin privileges. You’ll need this level of access to initiate data transfers between users.
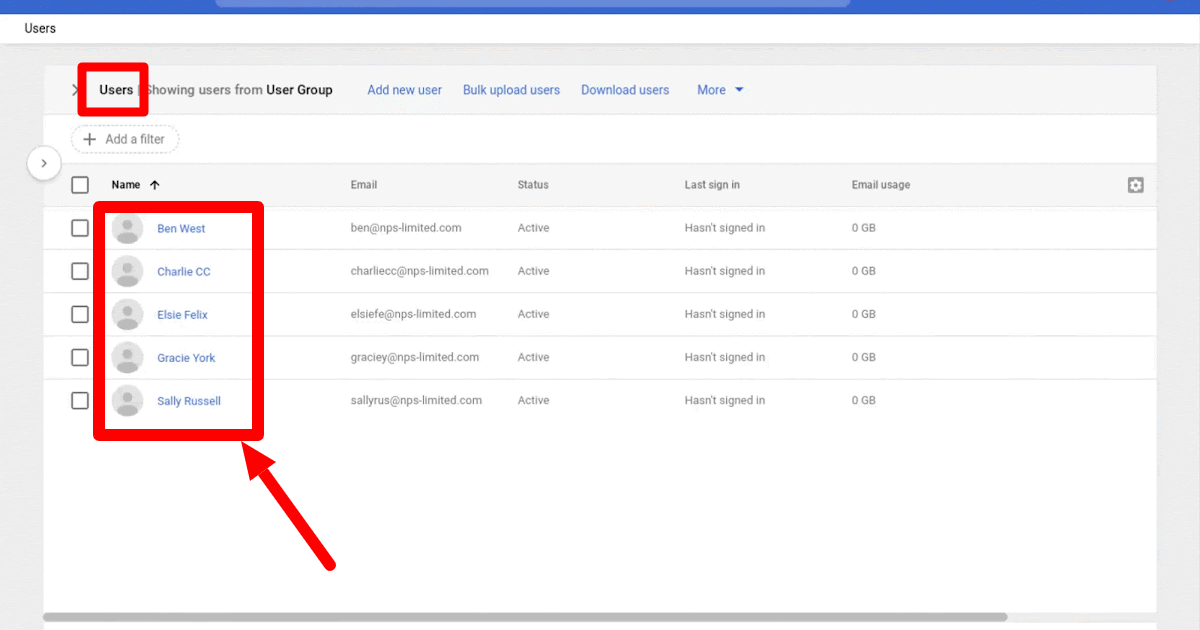
Make sure both the source account (from which data will be moved) and the destination account (where data will be received) exist and are active. The Google Admin Console makes it simple to verify these user details and manage their access across the platform.
Prepare the Source and Destination Accounts
In any Google Workspace data migration, you need to clearly define the source (the original account) and destination (the receiving account). Let’s say you’re moving files from support@company.com to maintenance@company.com. You’ll want to ensure both accounts are properly provisioned and that the destination has enough storage space to receive potentially large amounts of data—especially if the source account has years of archived emails and gigabytes of Drive files.
Also note: the migration does not erase data on the destination account. It simply adds a new folder labeled with the source user’s email—this helps keep things organized and avoids overwriting any existing data.
Transfer Google Drive and Docs Ownership
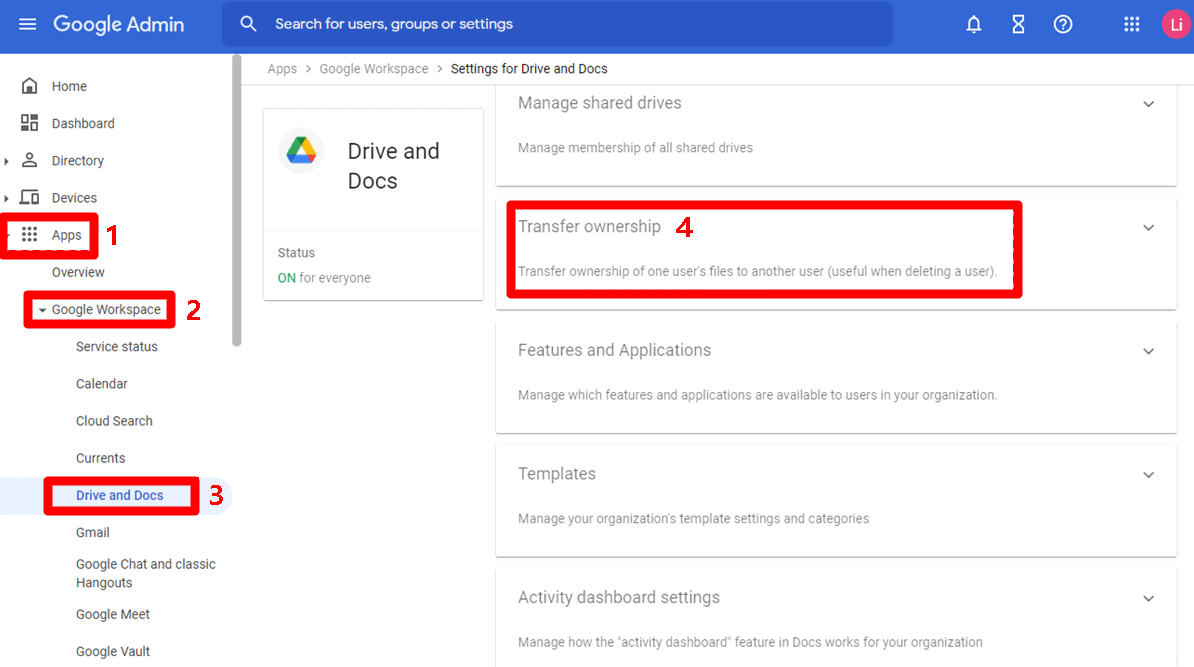
The first and most important step is to transfer ownership of Google Drive content. This includes Docs, Sheets, Slides, PDFs, and any other file types stored in Drive. Here’s how to do it:
- In the Admin Console, go to Apps > Google Workspace > Drive and Docs.
- Scroll down to find Transfer ownership.
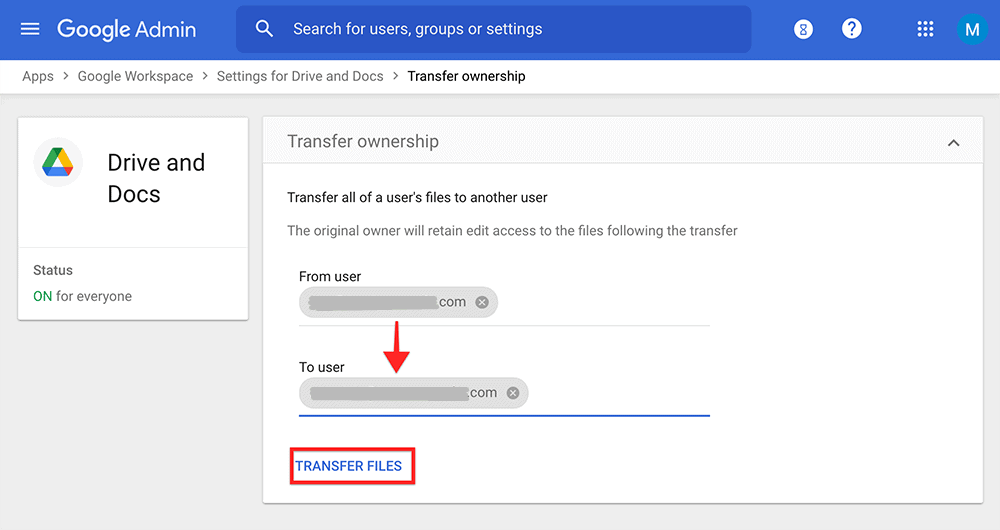
- Enter the source user email (e.g., support@company.com).
- Enter the destination user email (e.g., maintenance@company.com).
- Click Transfer Files.
Google will process the request in the background. Once complete, both users will receive an email confirming the transfer. The destination user will see a new folder named after the source email address, containing all transferred content. This method is clean, quick, and helps with future audits.
Check and Verify Drive Transfer Results
After the ownership transfer completes, it’s essential to verify the results. Log into the destination user’s Google Drive and locate the folder named after the source account. Open it and review the contents—check that all documents, spreadsheets, presentations, and folders are intact.
Also, review the source account’s Drive to ensure the content has been removed (as ownership has been transferred). This double-check prevents accidental data duplication and confirms that the process worked as intended.
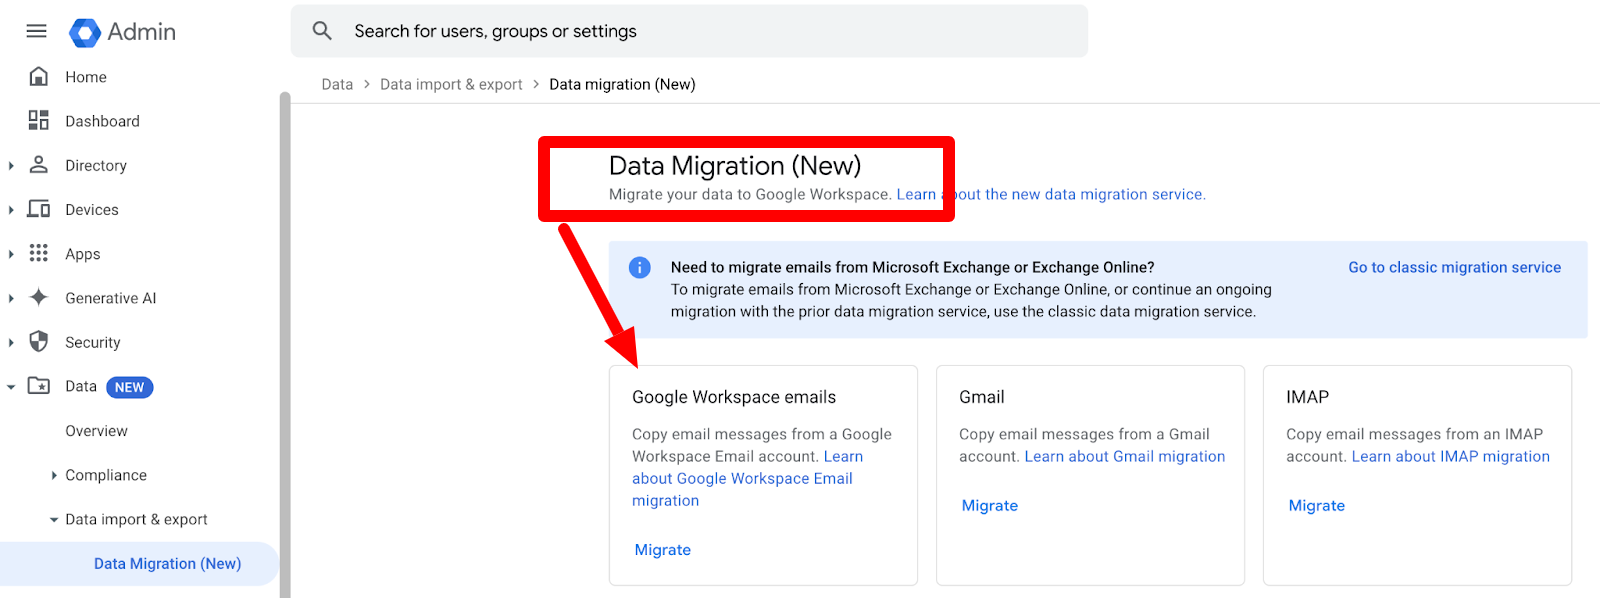
Migrate Gmail from One Google Workspace Account to Another
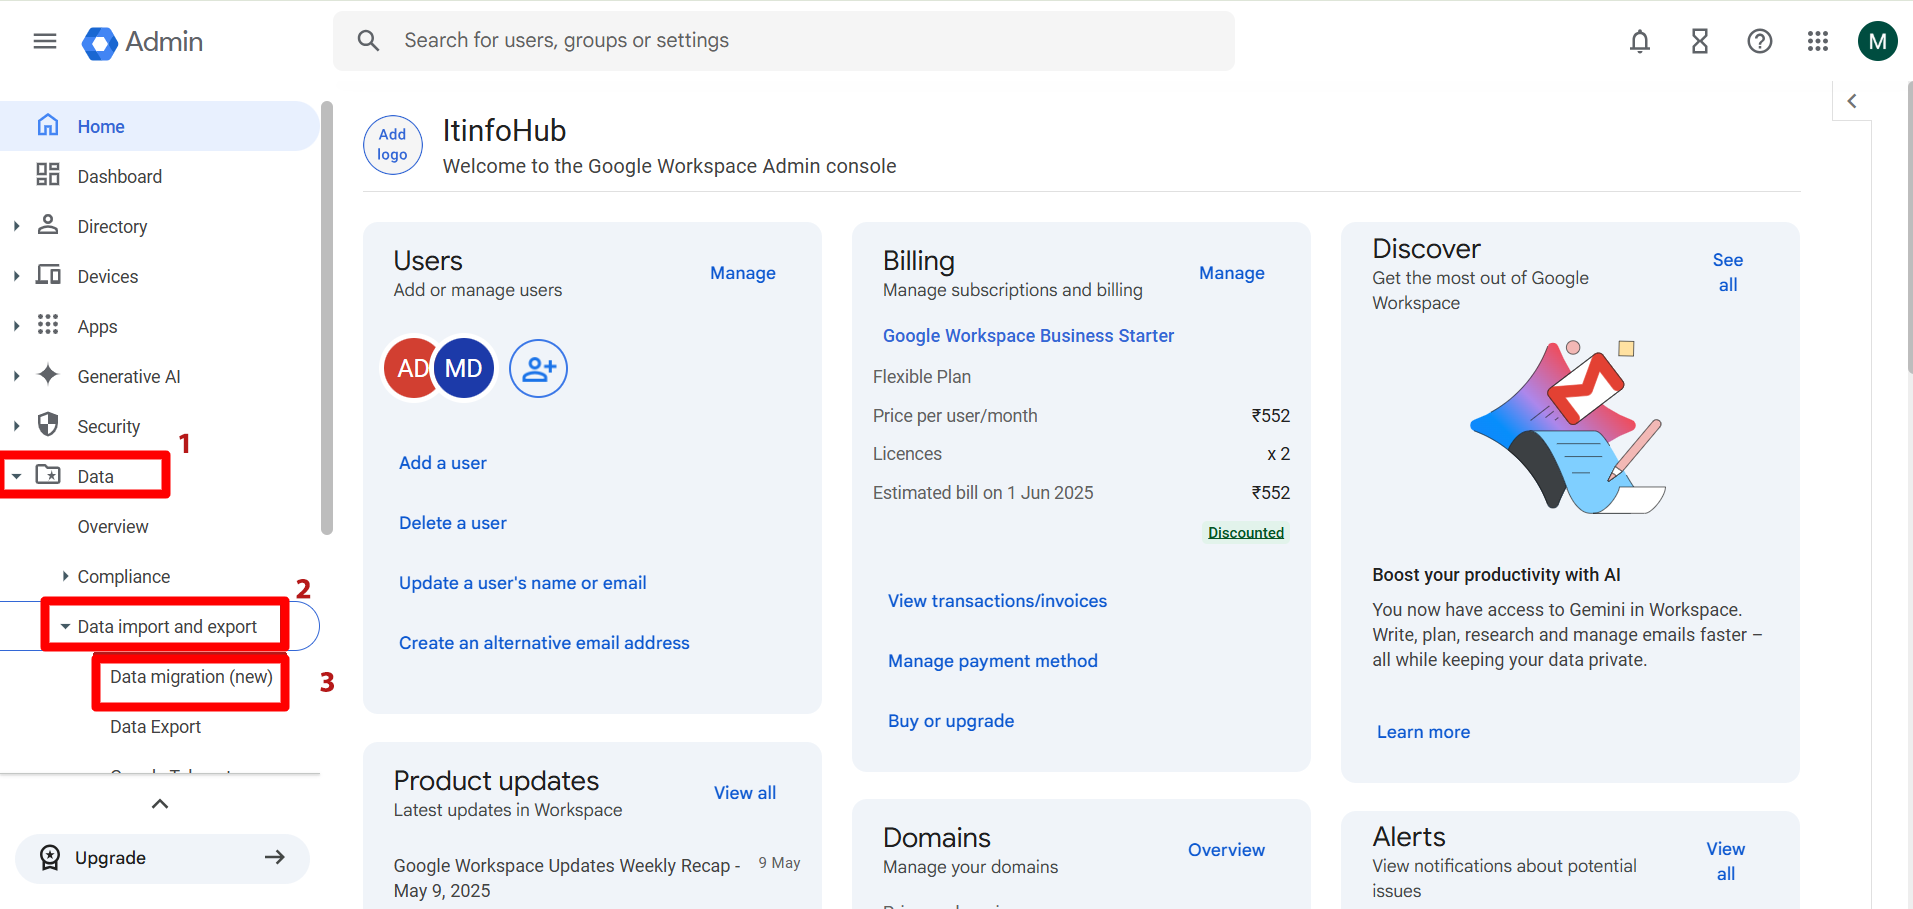
While Google Drive has a dedicated transfer feature, Gmail migration takes a slightly different path. For this, Google Workspace provides the Data Migration tool, also found in the Admin Console.
Here’s how to proceed:
- In the Admin Console, click on Account > Data Migration.
- Choose to Add User.
- Enter the source email address.
- Click Authorize, then sign in with the source credentials.
- After authorization, enter the destination email address.
- Click Start.
The process may take time depending on the volume of emails being moved. You can monitor the status in the Admin Console. Once completed, all emails will appear in the destination user’s Gmail inbox.
This tool is ideal for preserving email threads, timestamps, attachments, and labels—ensuring nothing is lost during the transition.
Validate Email Transfer and Clean Up
Once Gmail migration is marked as “Complete,” log in to the destination Gmail account and verify that the emails have indeed arrived. Scan through several messages, confirm attachments are present, and test search functionality to ensure full migration success.
Importantly, remember that the emails will still remain on the source account until that user is deleted. This redundancy gives you time to validate everything before proceeding with cleanup. Only after you’re fully confident should you consider deleting the source user, which will permanently remove all associated data.
Save on License Costs by Deleting Migrated Users
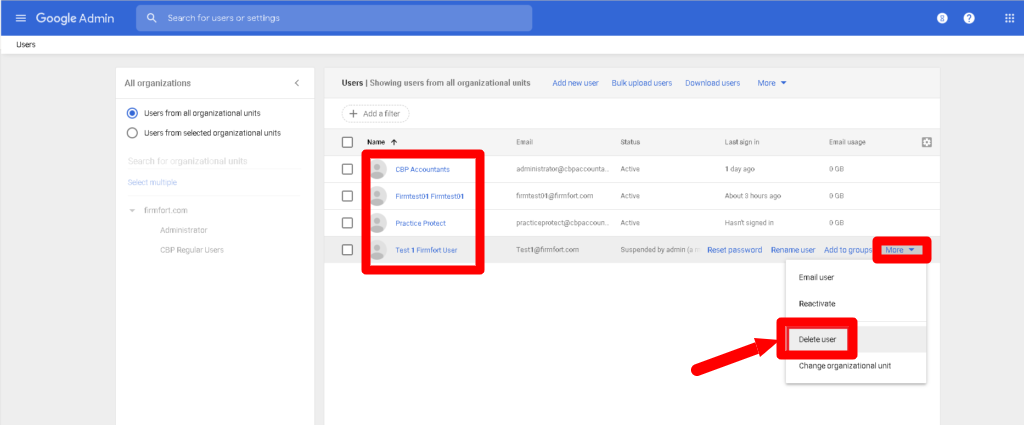
One of the benefits of successfully migrating Google Workspace accounts is that you can then delete unused users—which helps reduce your monthly Google Workspace license costs. Before doing so, double-check:
- Drive files are present and accessible in the destination account.
- All necessary Gmail messages have been received.
- There are no pending calendar or third-party app connections needed from the old account.
Once confirmed, navigate back to the Admin Console and delete the user. Google will give a final warning before deleting, as this action is irreversible.
Best Practices for a Successful Migration
Here are a few bonus tips to make your migration stress-free:
- Backup first: If possible, take a Google Takeout export or third-party backup before starting.
- Communicate with users: Let both source and destination users know about the migration timeline.
- Monitor storage: Make sure the destination account has enough quota to receive the transferred data.
- Avoid rush hours: Perform migrations during off-hours to reduce the impact on your team’s productivity.
With these best practices, your migration will be more efficient and less prone to surprises.
Any questions, comments, or reactions about our article, we’re happy to hear that in the comment section below. We always love diving into healthy discussions. If you also feel that you haven’t been using Google Workspace at its best, reach us at (Cloud Sultans : contact@cloudsultans.com).
We offer free consultation or system audit to find you the best possible solution.